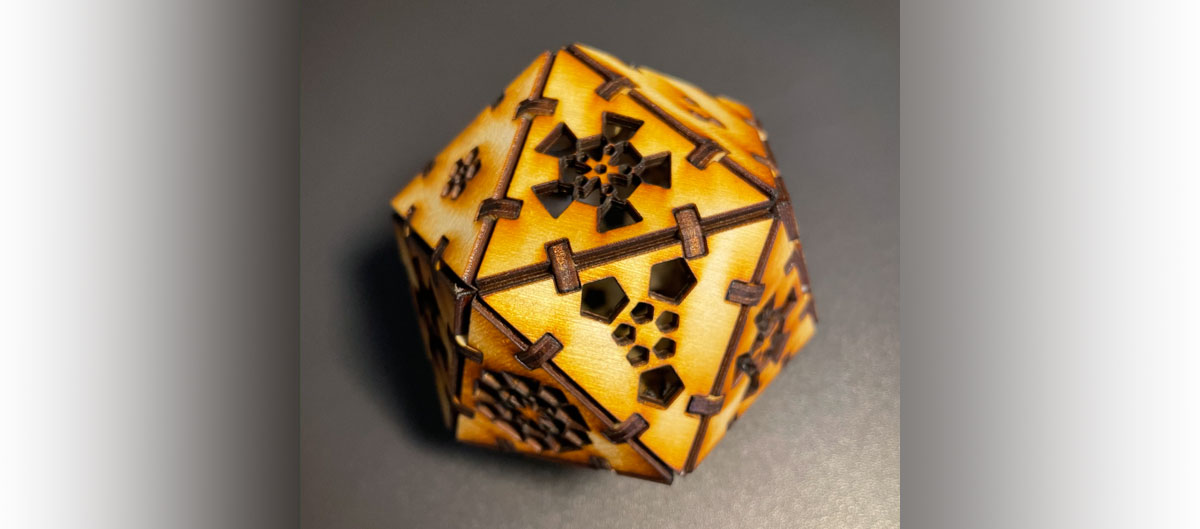
Sylvan Crafts – 20-Sided Die / Polyhedron Assembly
Things to consider before you assemble your Sylvan Crafts kit:
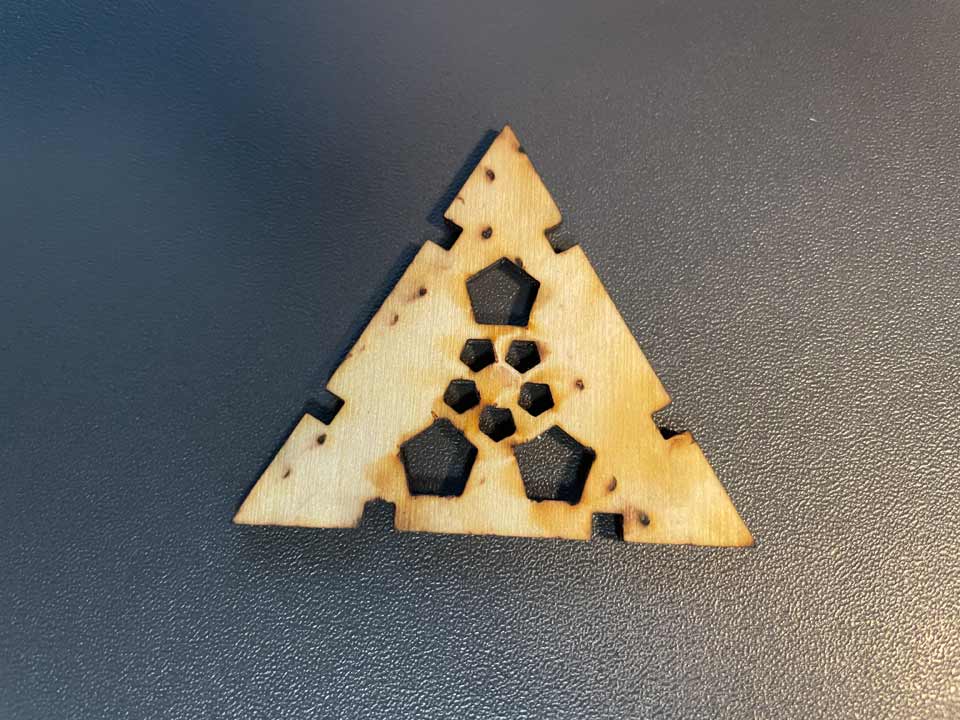
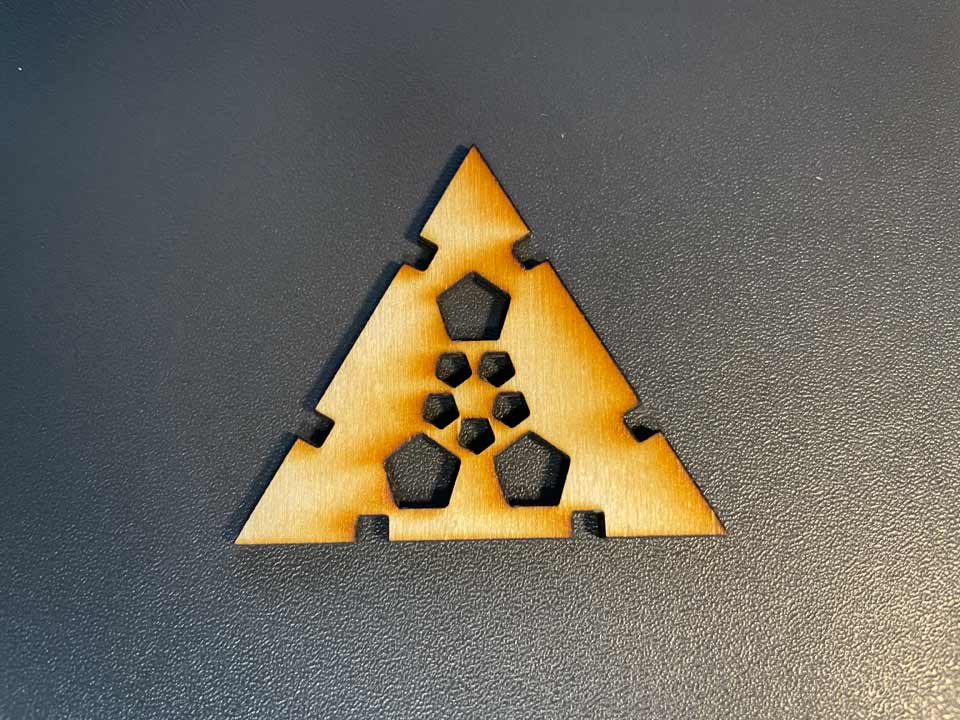
This model was laser cut from natural wood so will have burn marks and scorching. The burns and scorching actually add to the appeal and aesthetics of the wood, so we recommend you assemble your kit with the scorched side of each piece facing outward, for optimal attractiveness.
We recommend completing assembly in one sitting; although it is certainly possible to assemble the kit in multiple sessions. Assembling in one sitting allows for you to work while the glue is still a bit flexible, especially if something is slightly out of alignment. A typical first-timer assembly of this kit should take about an hour and a half.
Handy Tip:
Take a quick scroll through all the instructions below to familiarize yourself with the project before starting.Equipment Required:
- A good quality wood glue, such as Titebond/Titebond II (available at any home store). Wood glue will stay flexible as you work with the pieces.
- A craft mat, or some other work surface (not your nana's good dining room table) where you don't have to worry about glue getting on anything. Kitchen parchment paper (used in baking) makes a wonderful work surface when taped flat with painters’ tape.
- A handful of wooden toothpicks for applying glue.
Prepare for Assembly:
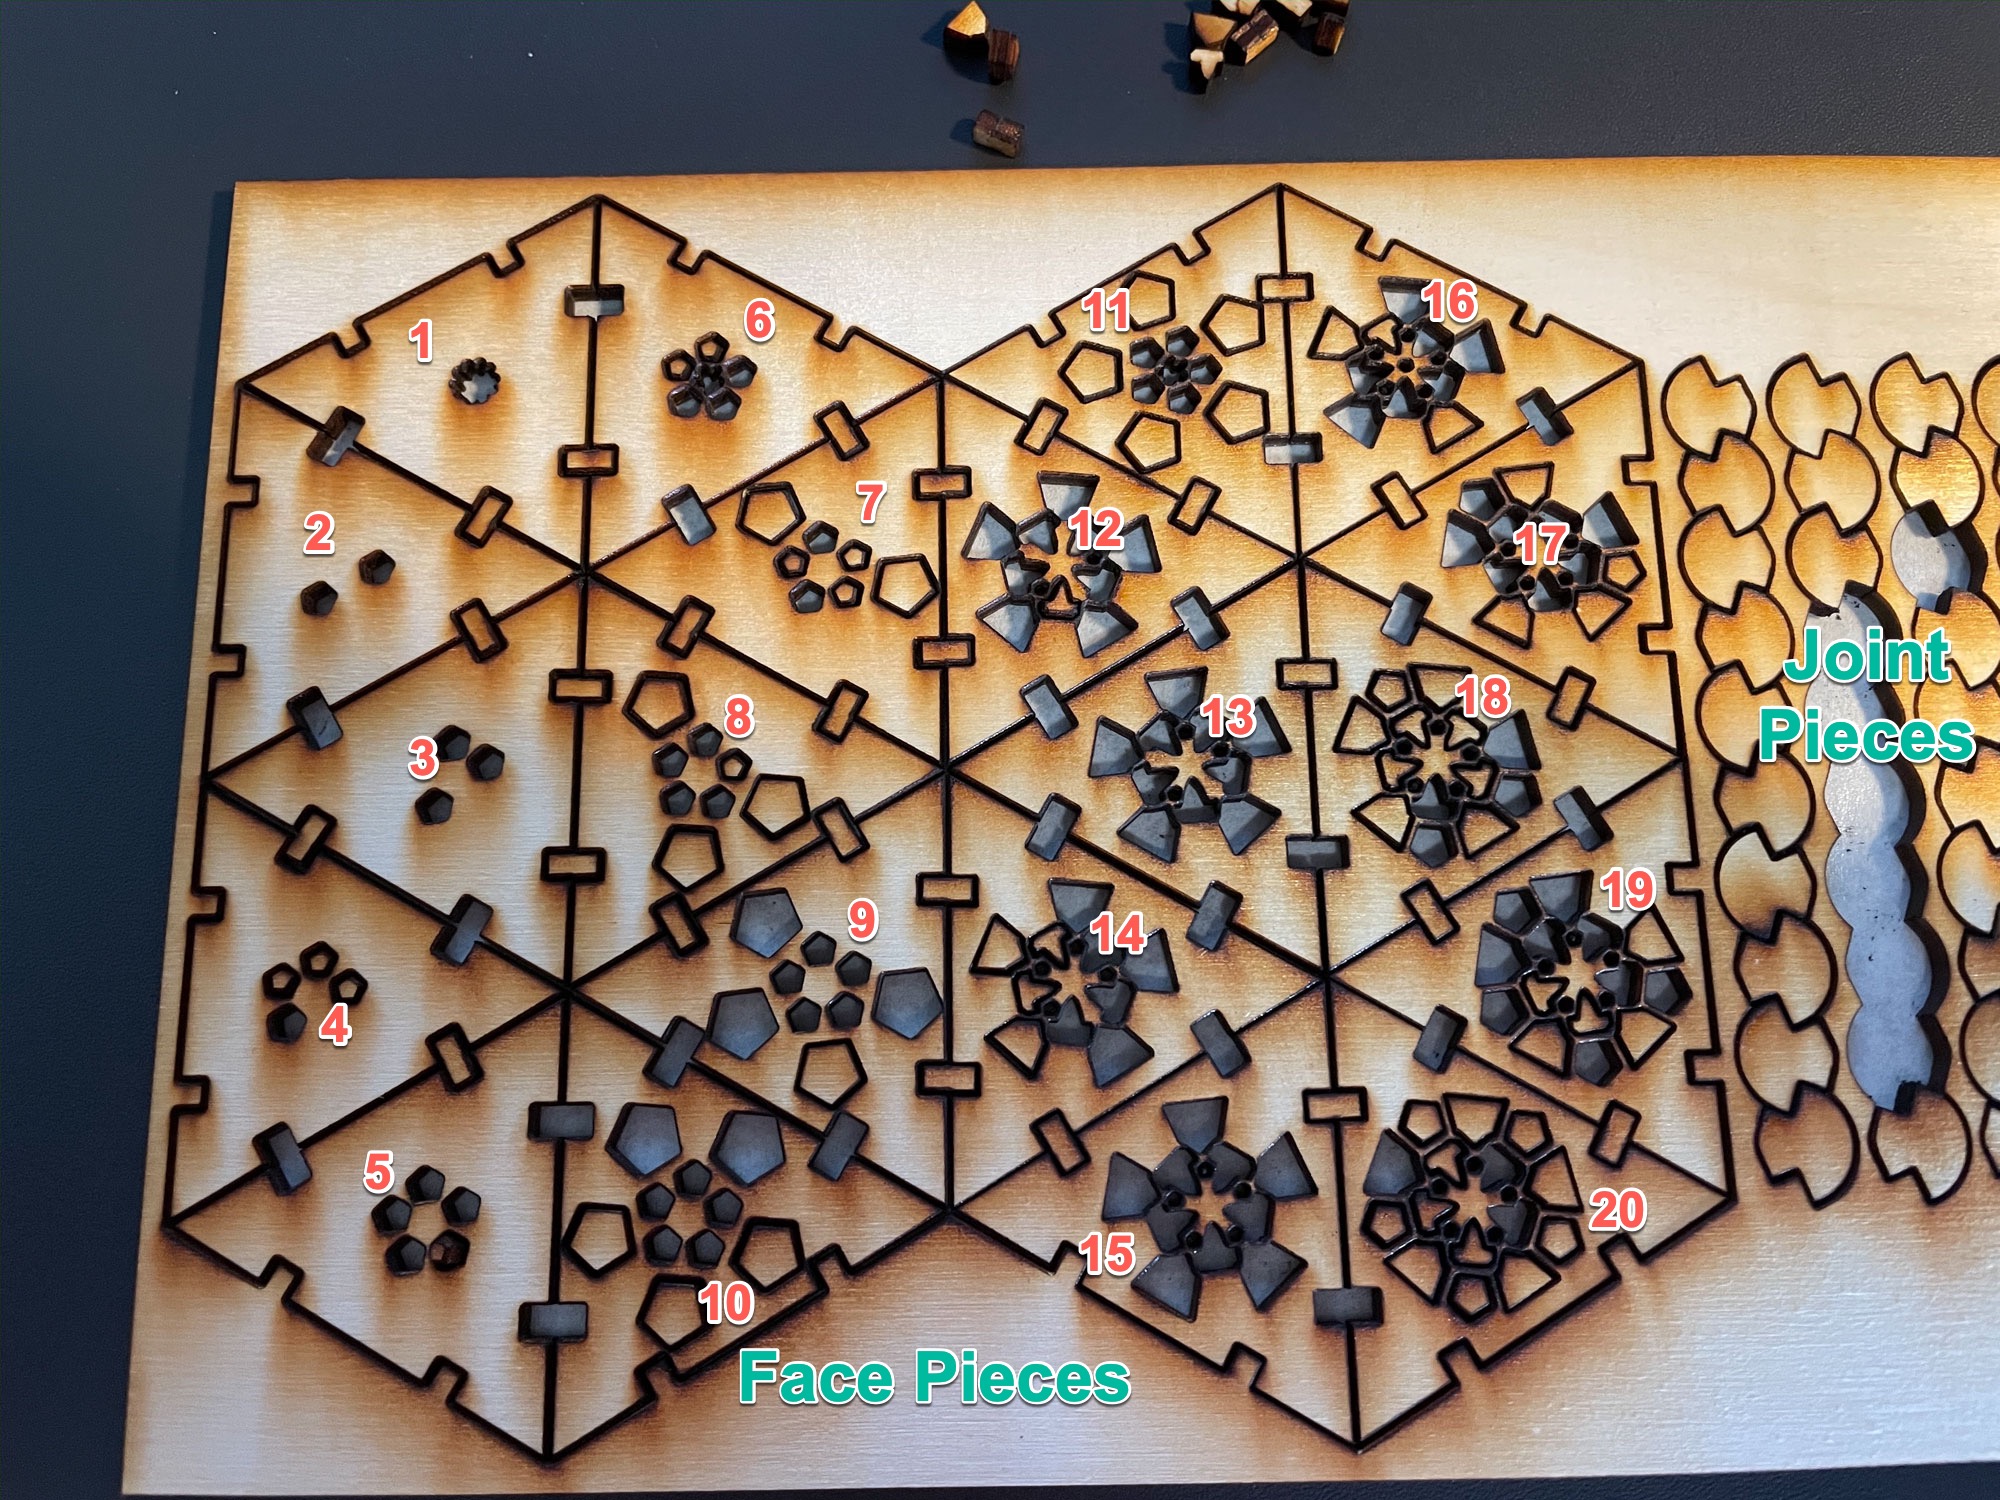
There are two types of pieces in this kit:
20 polygon face pieces (3-sided)
60 mushroom-shaped joint pieces
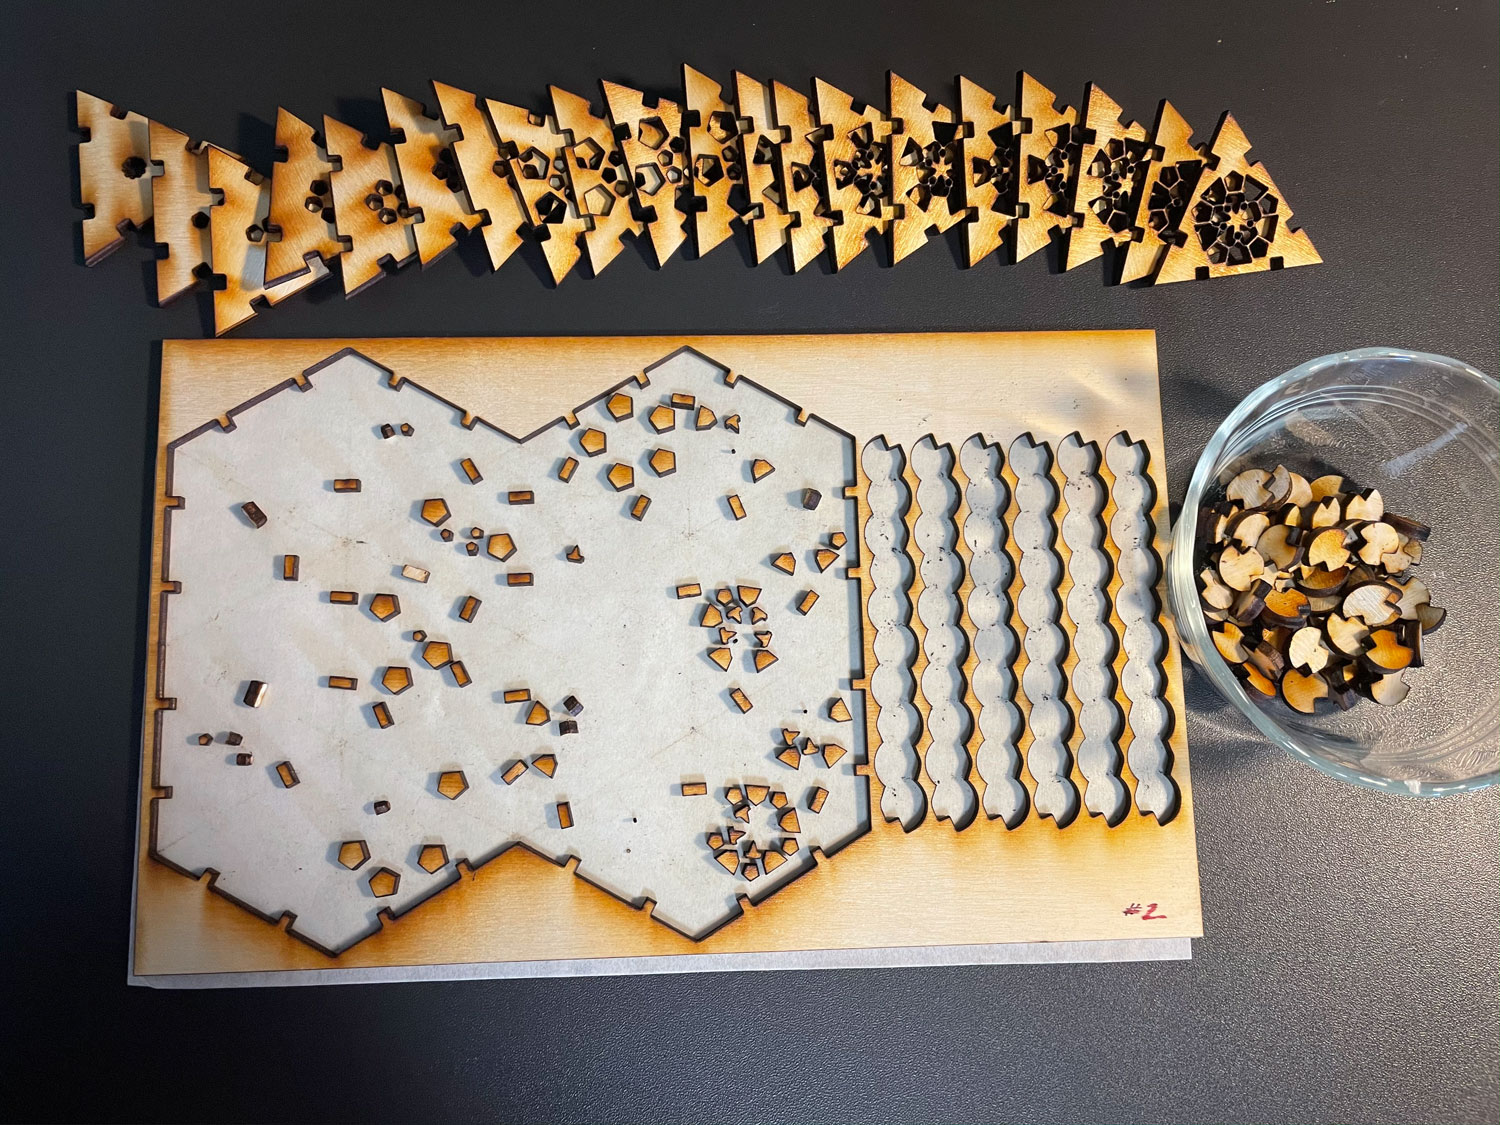
Separate Face Pieces and Joint Pieces From the Board:
- Peel top adhesive layer back carefully – exposing all pieces of the kit. NOTE: Some of the cutouts for the pips (holes in the face pieces) and sprue (junk between joint pieces) may stick to the adhesive paper. This is okay, as long as none of the small joint pieces are accidentally discarded.
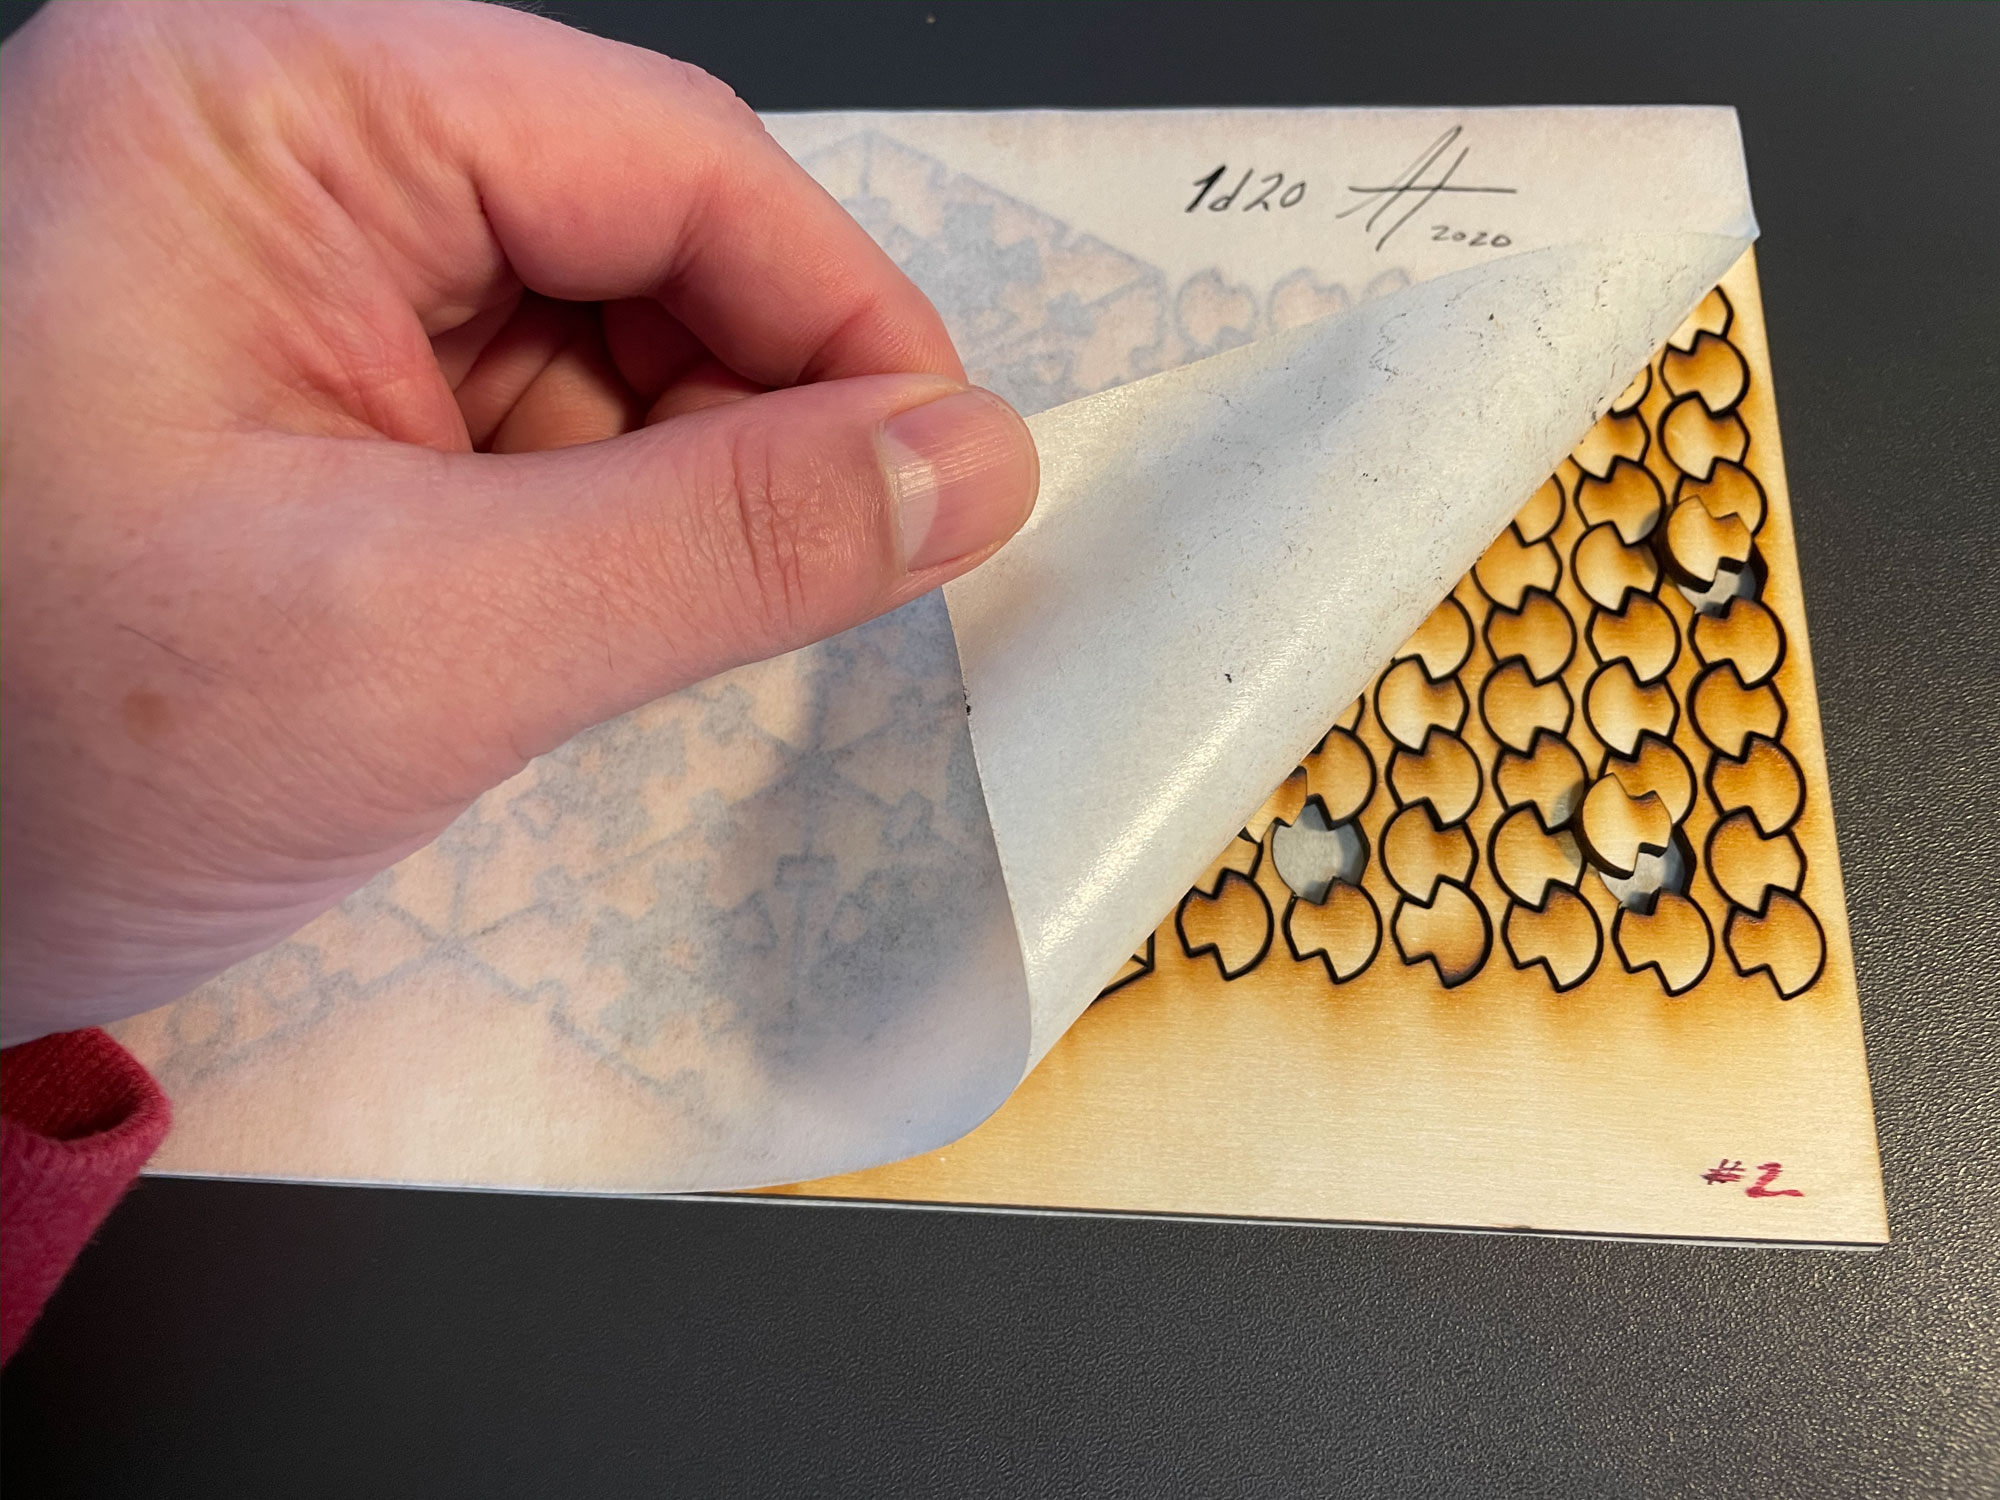
- Carefully remove all 60 joint pieces (the little mushroom looking guys) and place to the side – preferably in a little dish to keep them together.
- Carefully lift out the 20 triangular polygonal face pieces. You may need to use a toothpick to pop out any cutouts left in the pips of the face pieces. Usually the cutouts will stay stuck to the bottom adhesive paper. Stack the face pieces nearby in numeric order (for convenience). Once you are sure there are no joint pieces or face pieces left, you can discard the board in your green yard waste recycle bin (adhesive paper and all).
Assembly of First Half:
Put a blob of glue (about the size of a pea) on your work surface so you can easily dip your toothpick into it during assembly. Start a fresh glue puddle as needed.Important:
You will only be adding glue directly to the joint pieces; never to the face pieces themselves. The right way to glue a joint piece is to use a small amount of glue and with your toothpick, just cover the inner edges of one side of a joint piece. See the pink highlighted areas in the image below for where to apply glue.
Remember:
Keep the scorched/charred side on the outside of the assembled kit so you can enjoy the beautiful coloration of the wood.Prepping Your First Face Pieces:
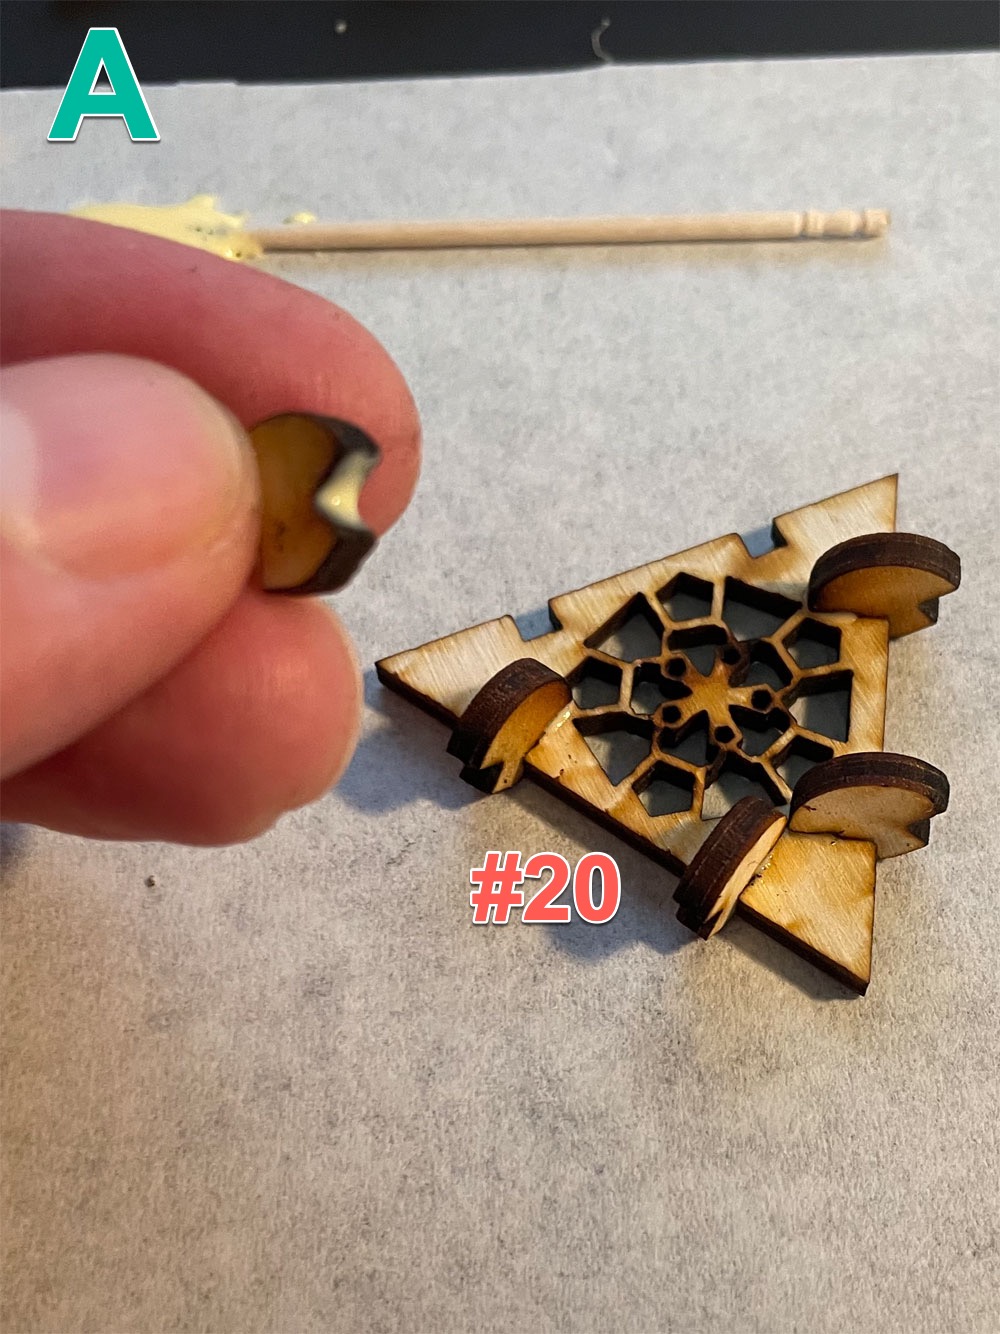
- Starting with face piece #20. Flip it over so the pale side is facing up (non charred side). Glue 6 joint pieces to the #20 face piece as seen in images A and B below. As the glue begins to dry, snug the joint pieces again against the face piece to ensure they are seated tightly. Set aside.
- Select face pieces #2, #4, #14, and #18. Starting with face piece #2, glue 2 joint pieces to any one edge, as seen in image C below. Repeat with each of these four face pieces.
- Next, we will be attaching the five pieces (#2, #4, #14, and #18) you just prepared. Each face will be glued to the #20 face along one of its two edges. Each succeeding face will be glued in the same orientation – meaning the edge with no joint pieces for all face pieces will orient the same way: clockwise or counter-clockwise when viewed from above. This allows each succeeeding face piece to connect to the prior piece.


Handy Tip:
When gluing the four face pieces (#2, #4, #14, and #18) to face piece #20, we recommend working with the face pieces cupped in your hand to help maintain their wide angle of connection. Hold the pieces for around 3 minutes so the glue will become tacky and start to hold the pieces more firmly. During this time, you can gently nudge pieces together with your cupped hand using your other hand to guide pieces together.Assembling the First Five Face Pieces:
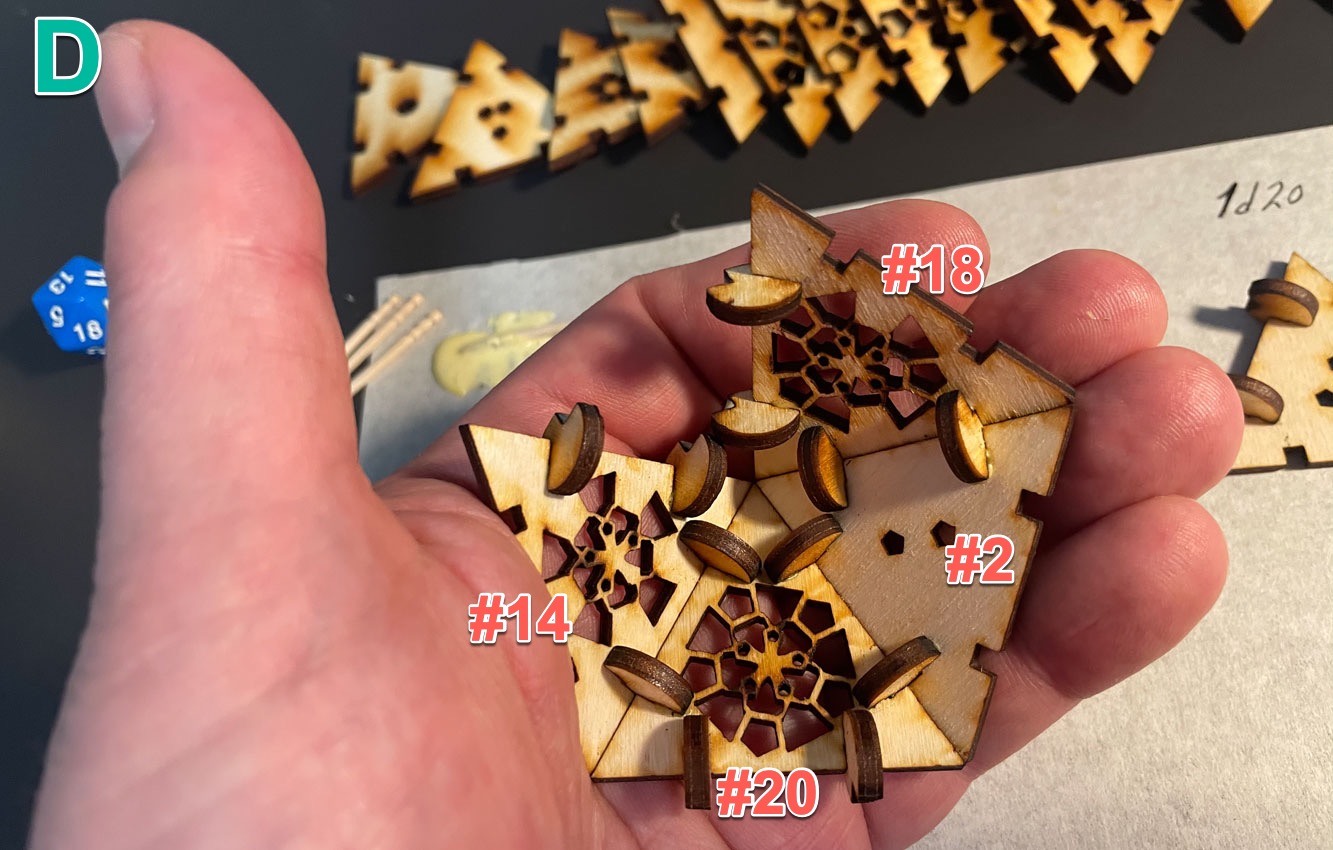
We will be attaching the four pieces (#2, #4, #14, and #18) you prepared in the last step. Each face will be glued to the #20 face piece. Look carefully at image D below. Note how face piece #2 is connected to the base #20. Face piece #2's joint pieces align to the left and connect to #18, whose joint pieces also point to the left. Face piece #14 is connected with its two joints facing to the right – pointing toward face piece #18. This gap will be filled with face piece #4 in the next step. It may help for you to "dry-fit" these pieces together without glue to see how everything will line up. Let's get started...
Remember to only apply glue to the joint pieces, and only where two face pieces are being joined together.
- Starting with face #20, apply glue to four joint pieces (the edges we are connecting in image D). Also go ahead and apply glue to the two joints on face pieces #2, #14, and #18. Don't worry it won't dry before we complete this section of construction, and a little extra time will make the glue tacky, allowing for easier assembly.
- Connect piece #2 to the bottom piece #20, making sure its joints point off to the left for connecting to face #18. Next, connect #18 to piece #2, making sure its two joints point to the left (not up). Finally, connect #14 to the base #20, making sure its two joints point to the right toward piece #18. Refer to image D below again for the orientation. Cup the pieces in your hand as the glue begins to firm up, and tweak them so that the edges remain tight.
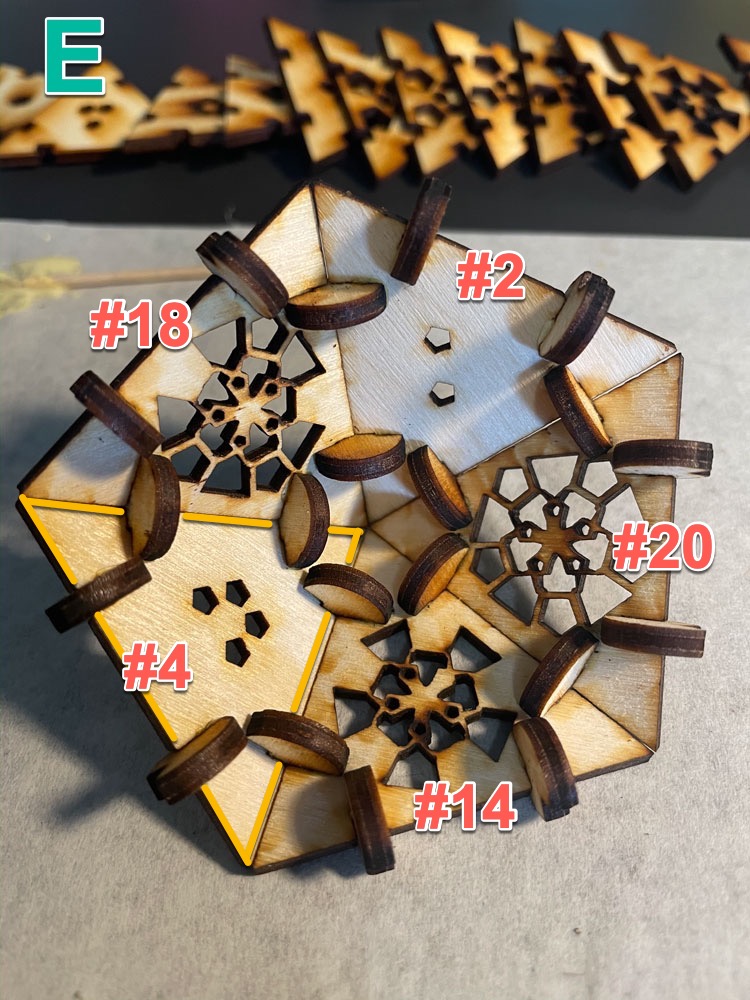
- Finally, attach piece #4 between pieces #14 and #18. There should already be glue on the joints, but if you missed one, make sure to apply some glue now. Piece #4's joints will be pointing up. Refer to image E below for the placement of piece #4. Piece #4 —outlined in yellow below— is the final face piece for this section of construction.
- Go ahead and glue joint pieces to all of the face pieces in your finished section with empty joint slots (should be 6 joints). Make sure all face pieces have joints now. Remember to only apply glue to one side of the joint pieces. Your construction should now look like image E below.
Interesting Fact:
Why is it important what order the faces are glued together? Since this model is a 20-sided die, there are common layouts of sides to assure when thrown, you get the most random value. This is desireable when using this die for gaming.Continuing Assembly:
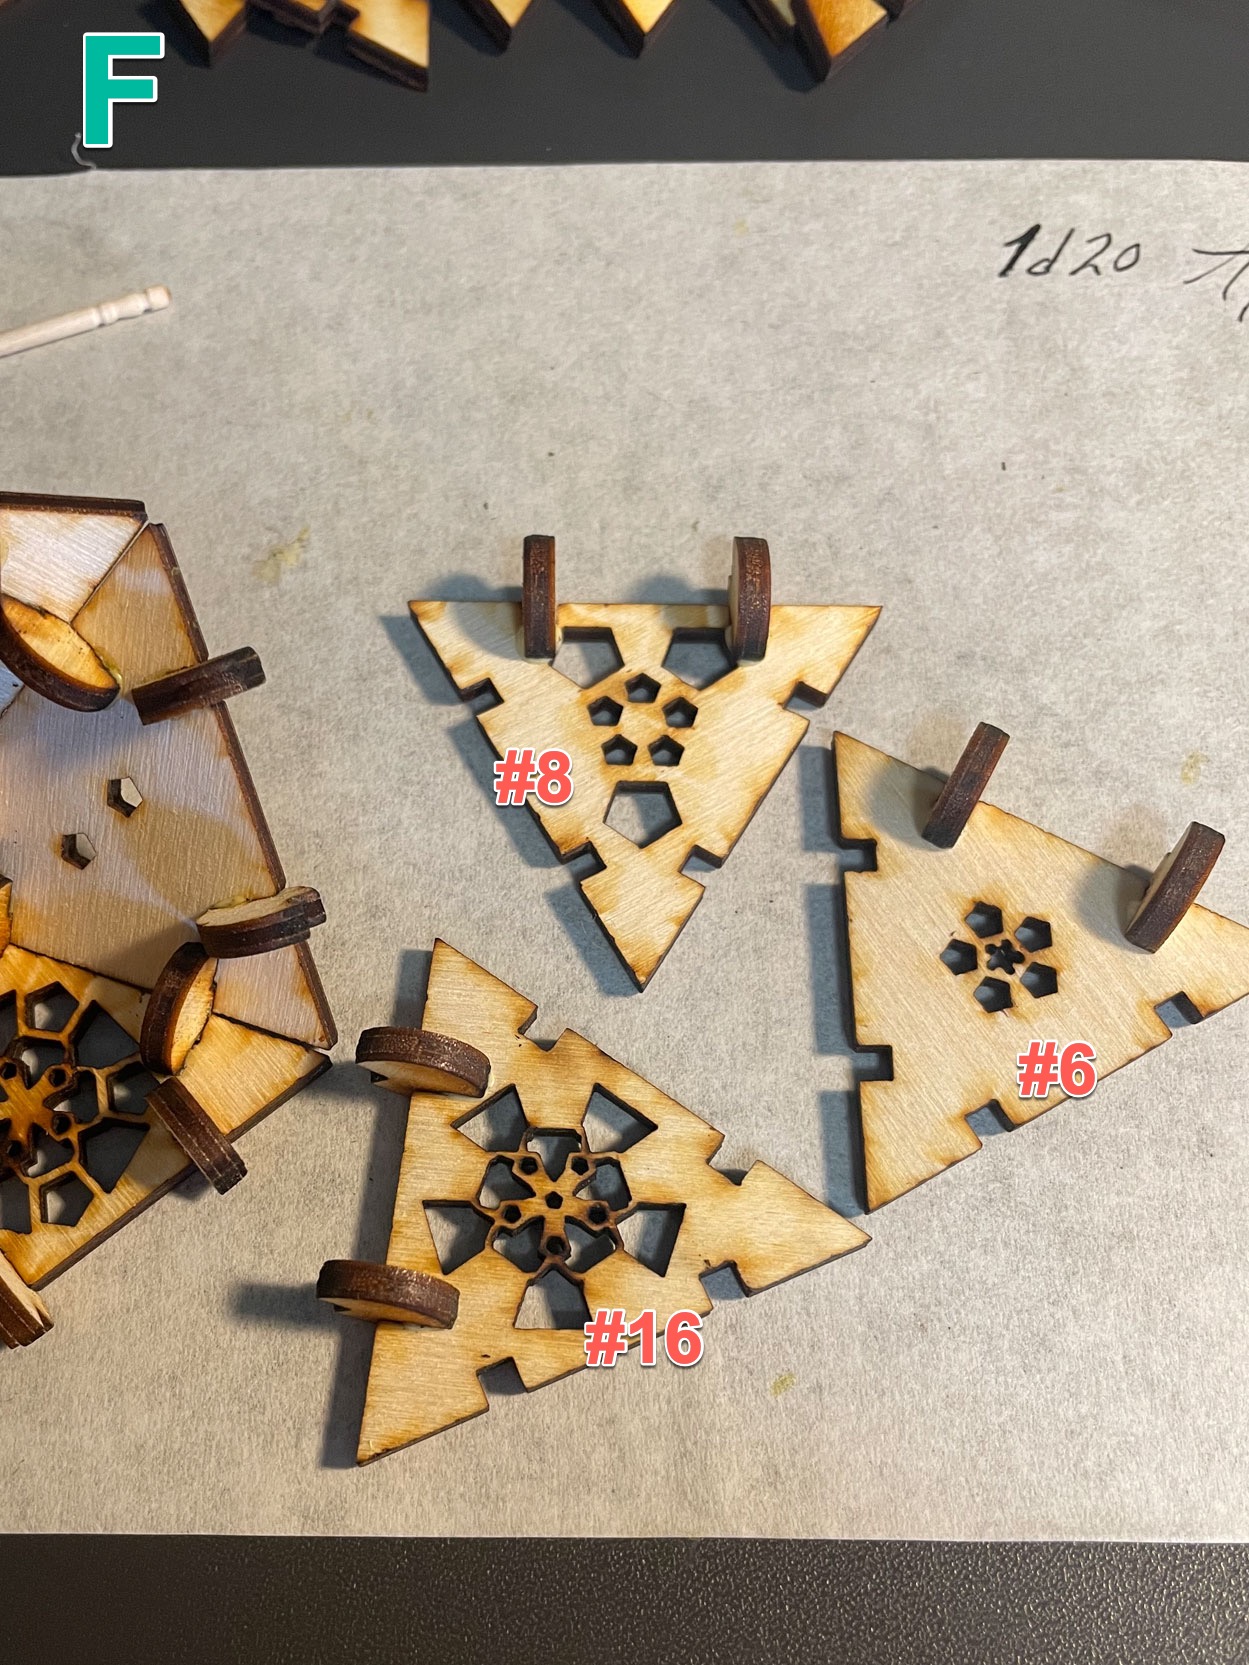
- Select face pieces #6, #8 and #16. glue 2 joint pieces to any one edge of these three face pieces, as seen in image F below. Let the glue dry for 2–3 minutes so the joints take hold.
- For the next step apply glue to the two joints on base piece #20 and two joints on piece #14 from your prior completed section.
- Next, apply glue to the two joint pieces on faces #8 and #16. DO NOT apply any glue to joints on piece #6.
- Hold the section you completed earlier in the palm of your hand or set it on your work surface with face piece #20 as the base.
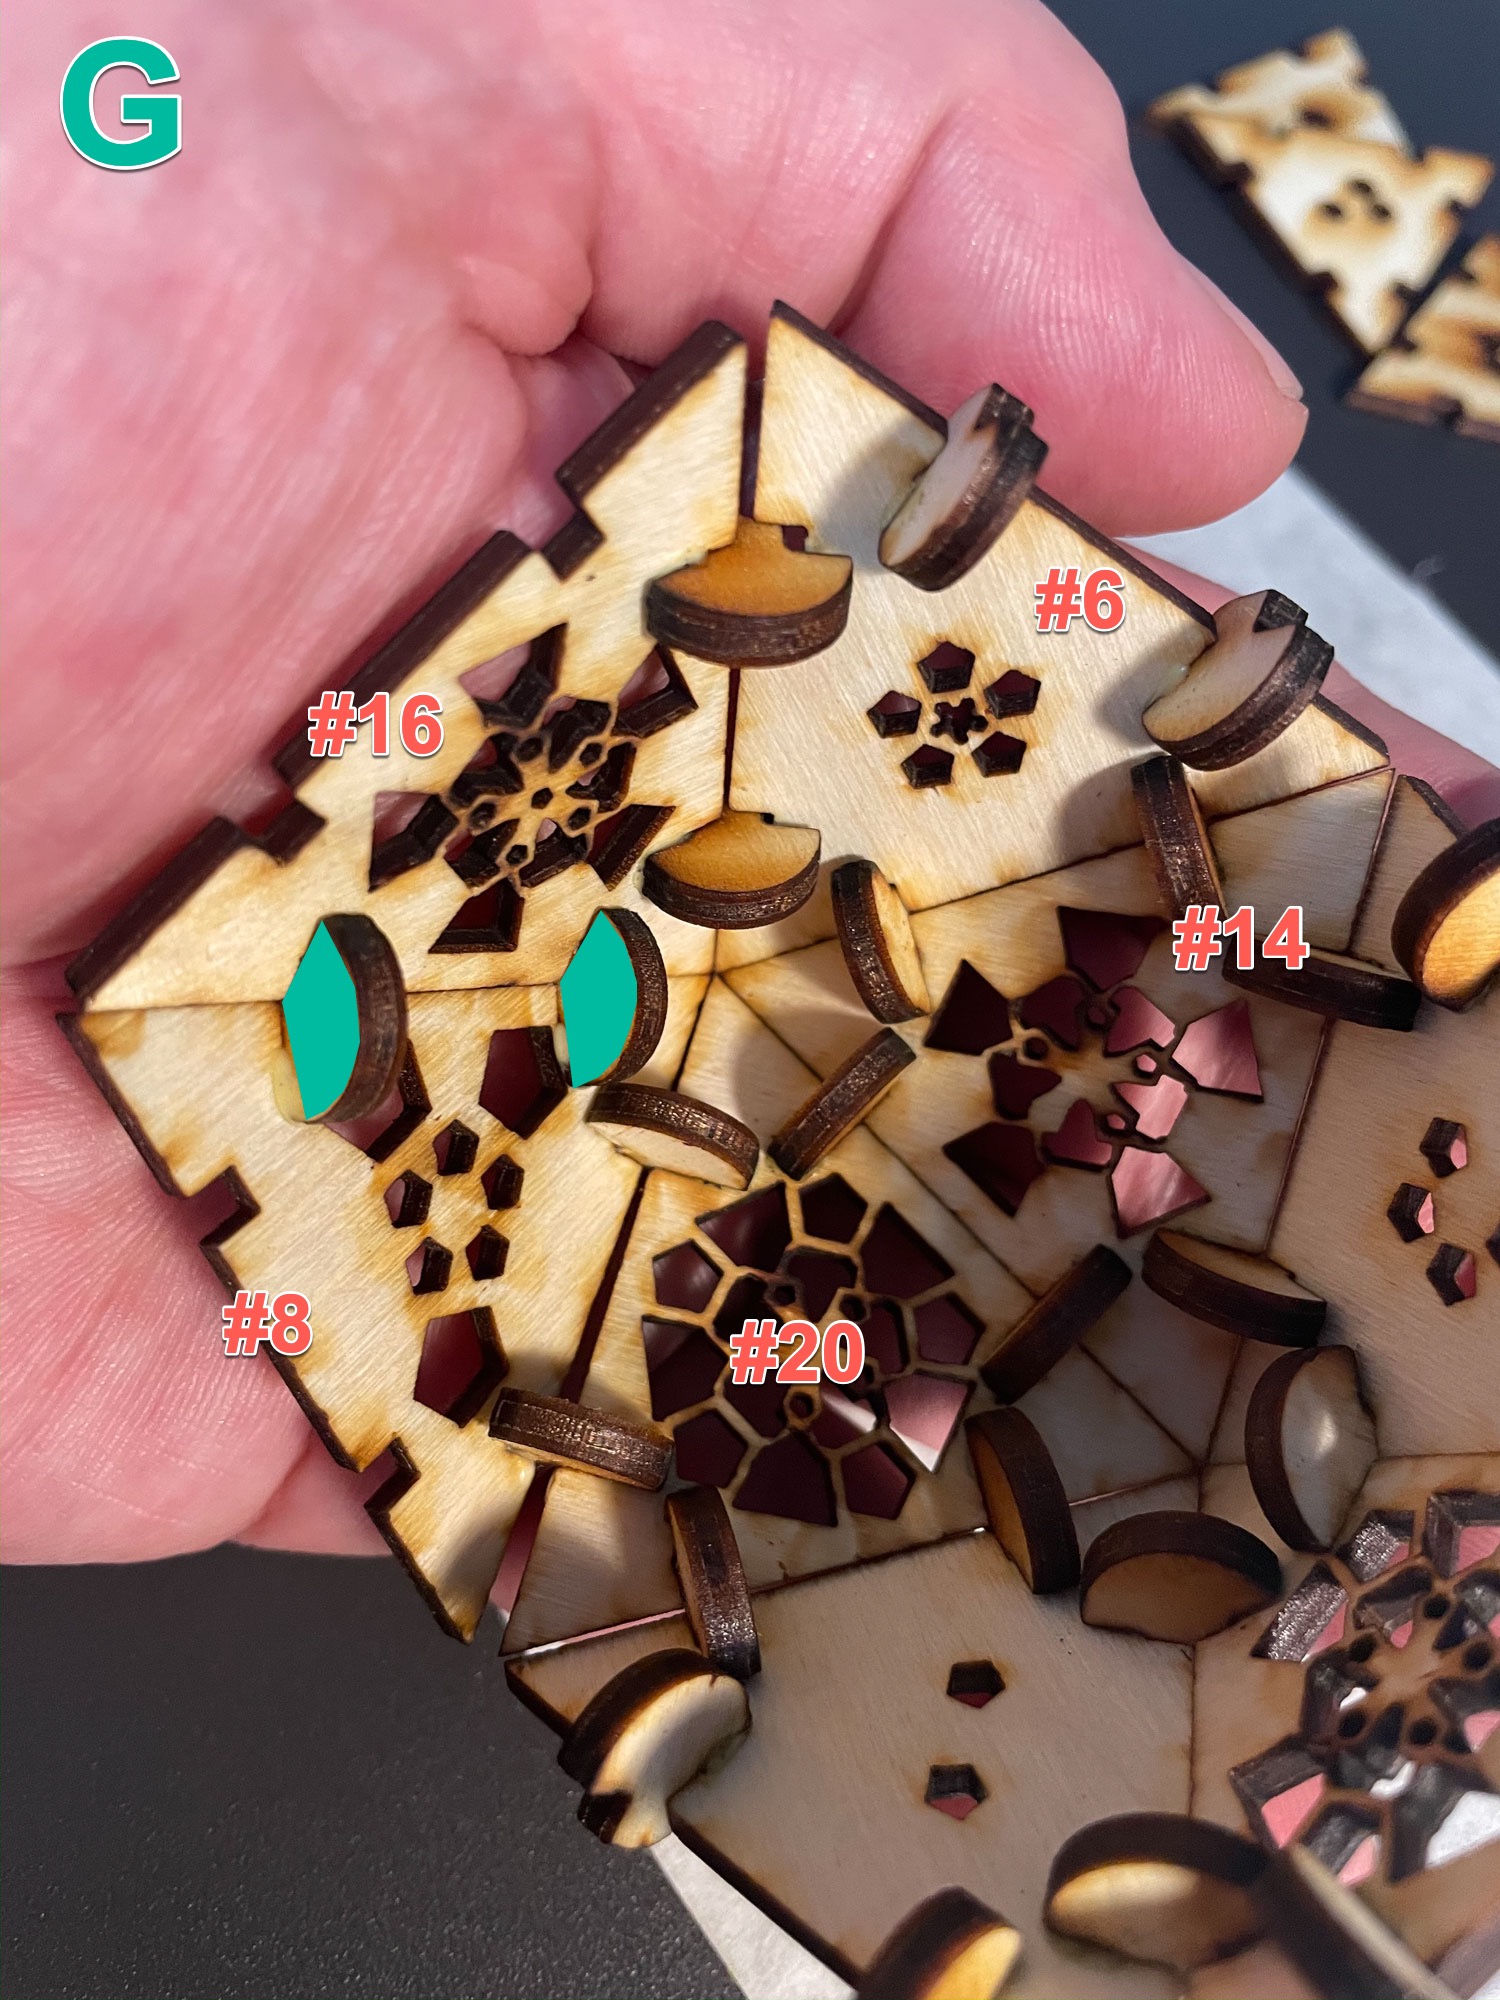
- Starting with face #8, attach it to the base #20 with its two joint pieces, highlighted in green, pointing to the right as seen in image G. These joints will later be connected to face #16.
- Continue construction by connecting face #16 to face #8, again with face #16's two glue joints pointing to the right.
- Next, attach face #6 between #16 and #14. Your construction should now look like image G below.
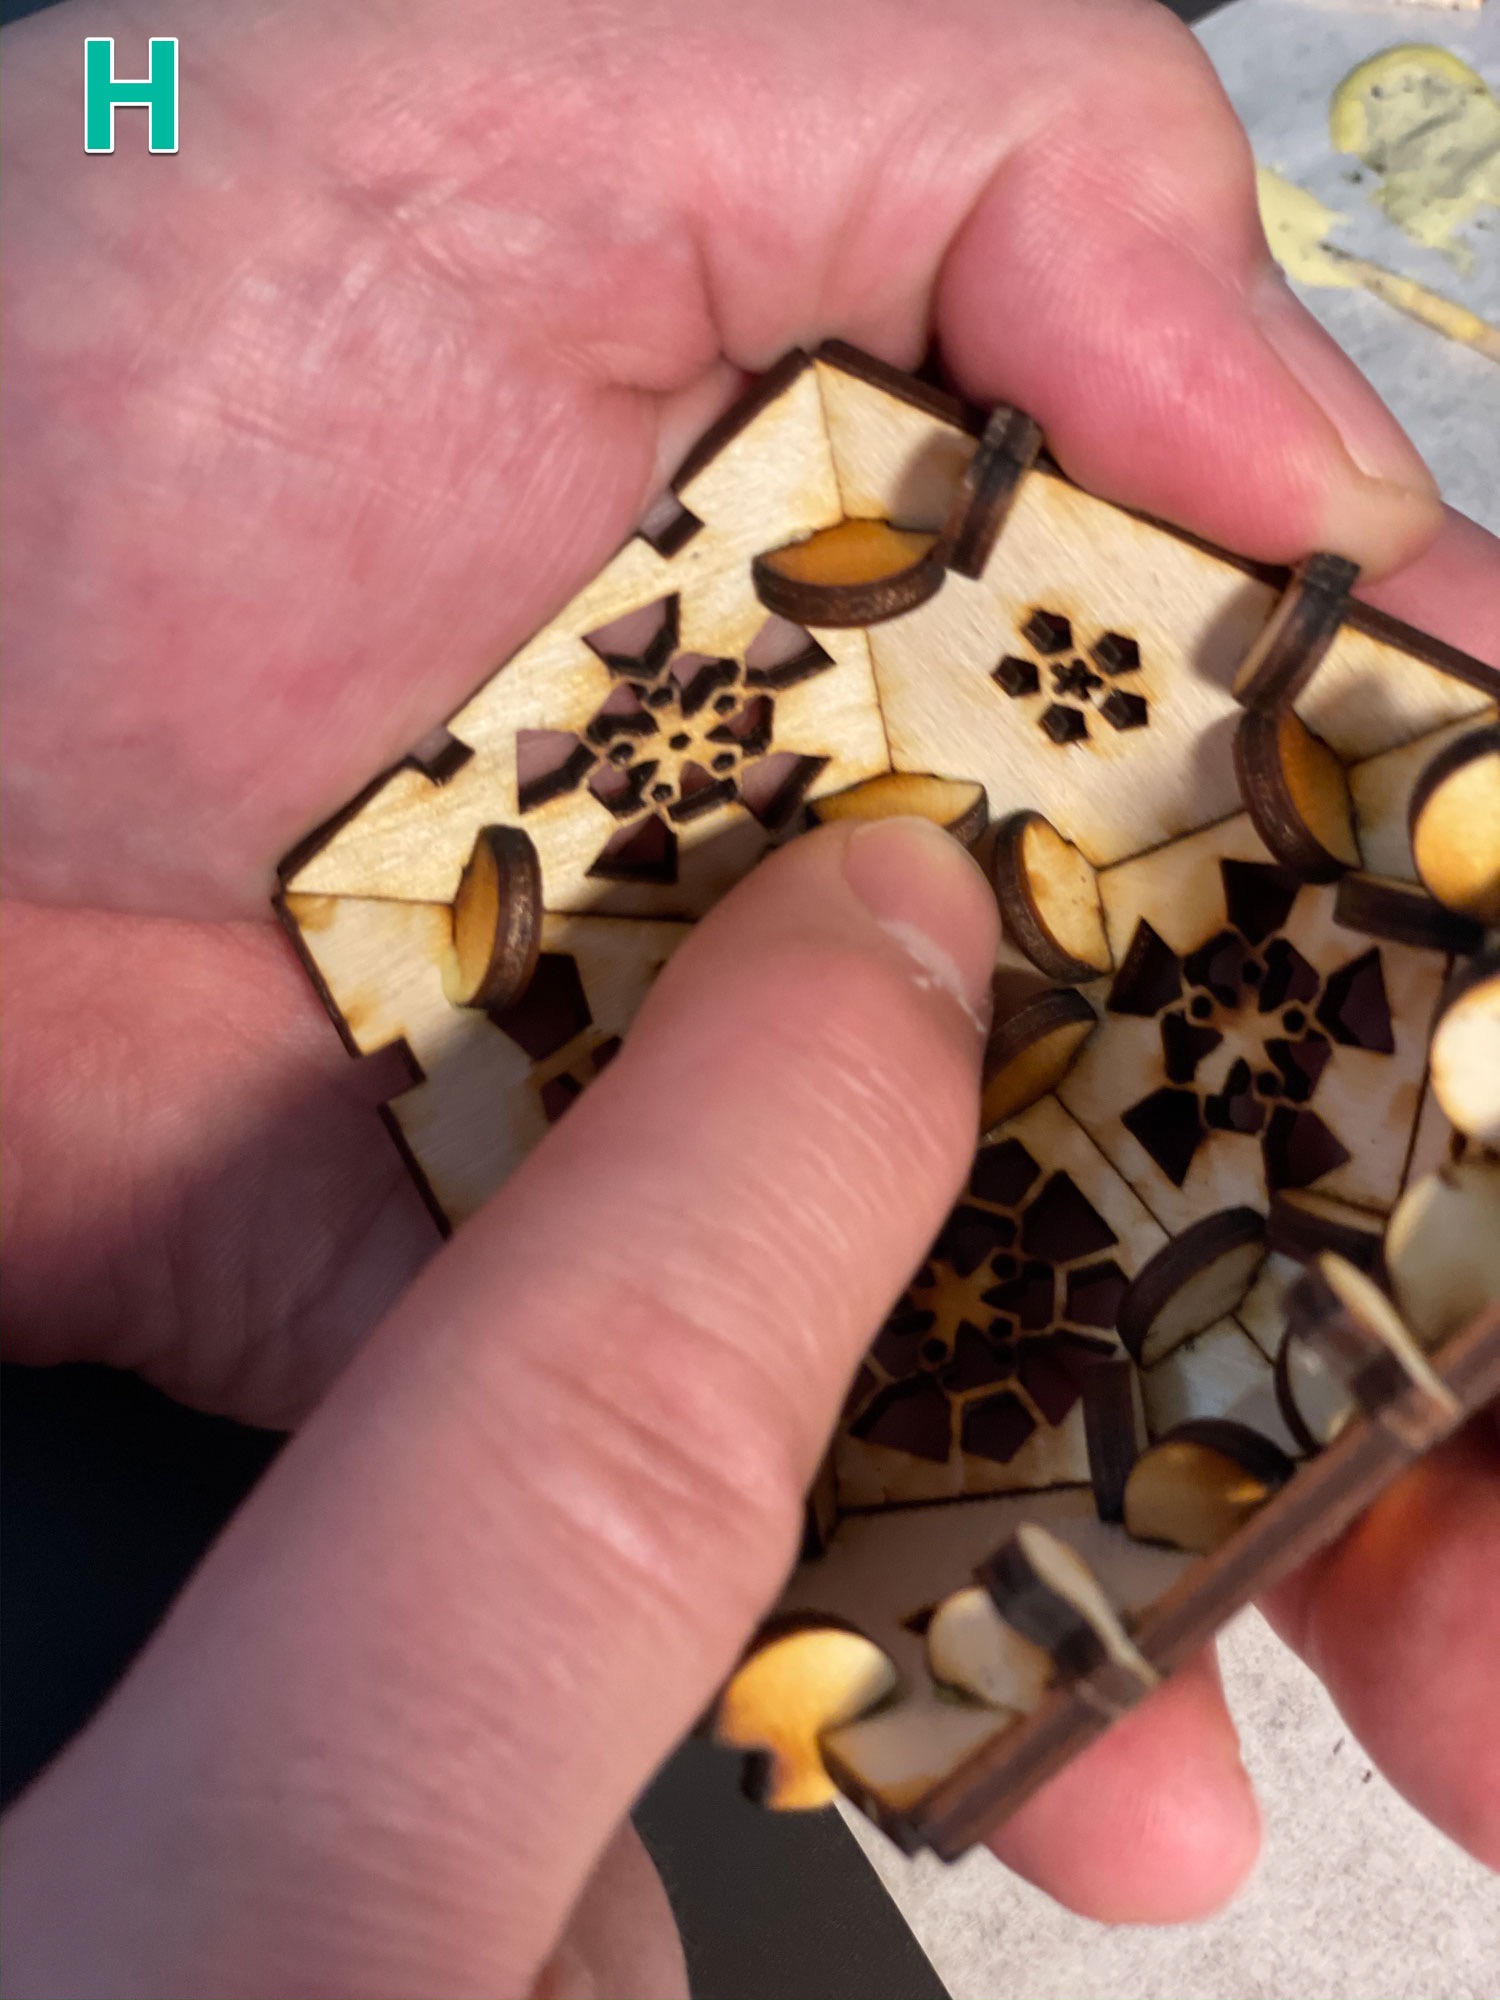
Notice the little gaps between the face pieces in image G below? Let's snug those up. While holding the construction in your palm, it helps to apply light pressure to the joint pieces, like in image H below, while simultaneously lightly squeezing/cupping the face pieces together in your hand to bring all face pieces together as snugly as possible. Holding and molding the construction like this for a few minutes will help it dry in the right shape with all face pieces at the correct angles. This takes a little fiddling, but your end result should look like image I below.
Last Steps For First Half of Polyhedron:
- Important: Look at the partially completed half of your project. If any of these edges do not have joint pieces, go ahead and glue joint pieces to these edges now. All outside face piece edges of your construction (6 of them) should have joints now. Let these joint pieces dry for around 2 minutes.
- Orient the construction again with face #20 on the bottom acting as the base and face pieces #2 and #8 facing away from you (see image J for orientation).
- Select face pieces #12 and #15. Glue 2 joint pieces to one side of each of these face pieces. Allow glue to set for a minute or so.
- Apply glue to the 2 joint pieces of face piece #2 and #8.
- Starting with face piece #12, attach this to face piece #8 with its two joints pointing to the left.
- Next, apply glue to the two joints on face piece #12 we just attached and make sure there is already glue on the two joint pieces of face #2 (if you didn't do this earlier).
- Slip face piece #15 between face #2 and #12 with its un-glued joint pieces facing outward.
- Hold the construction in your hand again and gently mold and cup the pieces until you feel everything is snug and joined tightly.
- Add 2 joint pices to face piece #12 and to any other outside face piece that does not have joint pieces. Your first half of the project should now look like image J below. If you want, for extra strength, you can dab glue with your toothpick to the inside edges between face pieces. Note the tiny glue globs we addded between the edges in image J below.
Congratulations! You've completed the first half of the polyhedron project.

Assembly of Second Half:
We are now ready to construct the second half (the other 10 faces) of the 20-sided polyhedron. All edges of this second side will have no joint pieces so it can be joined to the edges of the first half we already constructed that has all of the joint pieces.
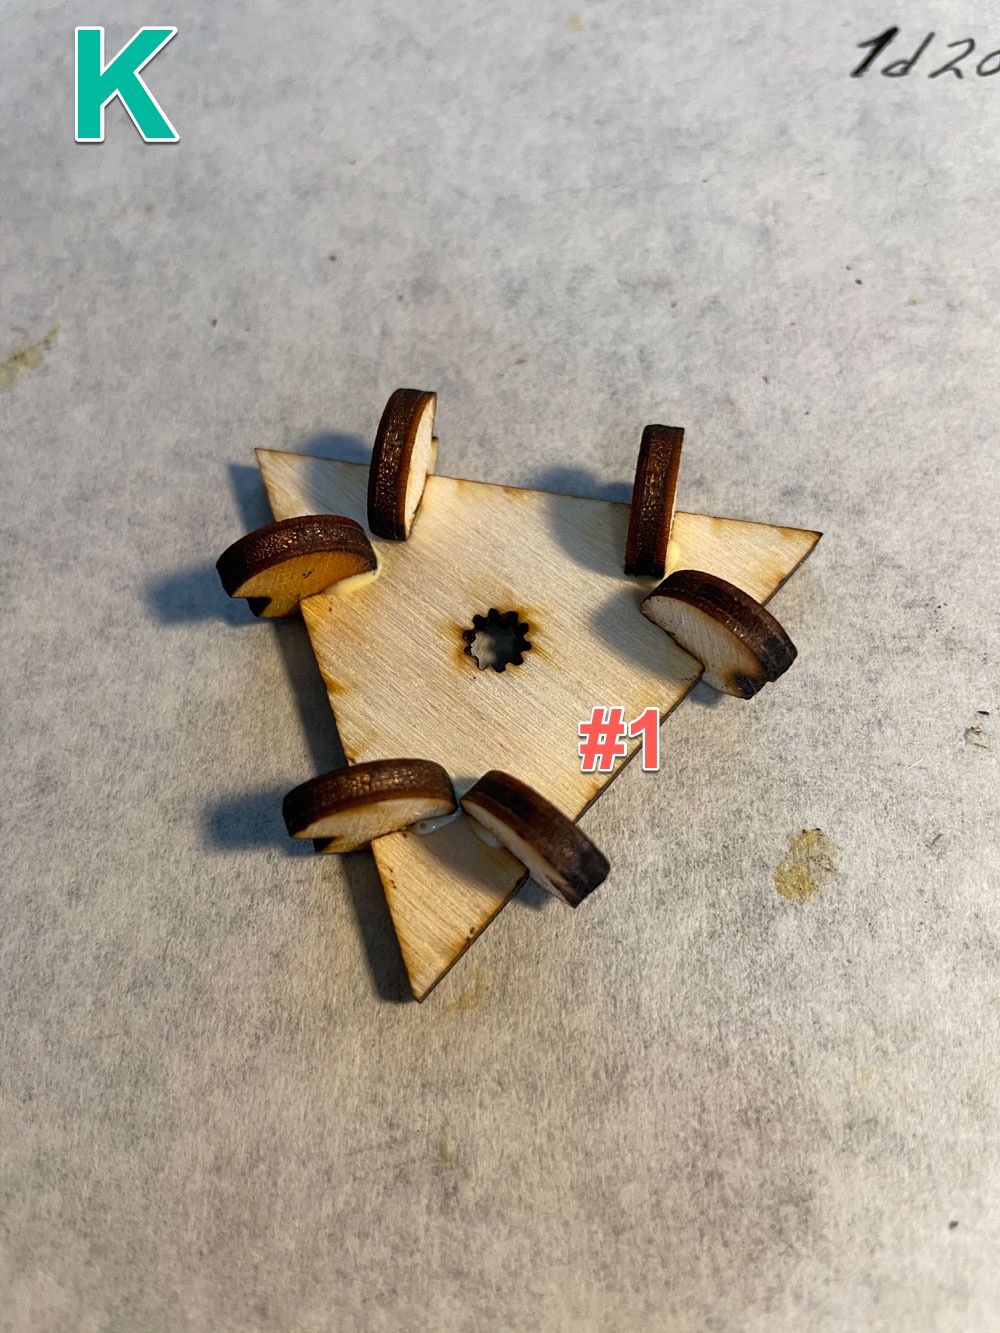
- Select face piece #1. Glue 6 joint pieces to its three edges as in image K below.
- Select face pieces #3, #7, #17 and #19. glue 2 joint pieces to any one edge of face pieces #3, #7, and #19, as seen in image L below. DO NOT glue any joints to face piece #17. Let the glue dry for 2–3 minutes so the joints take hold.
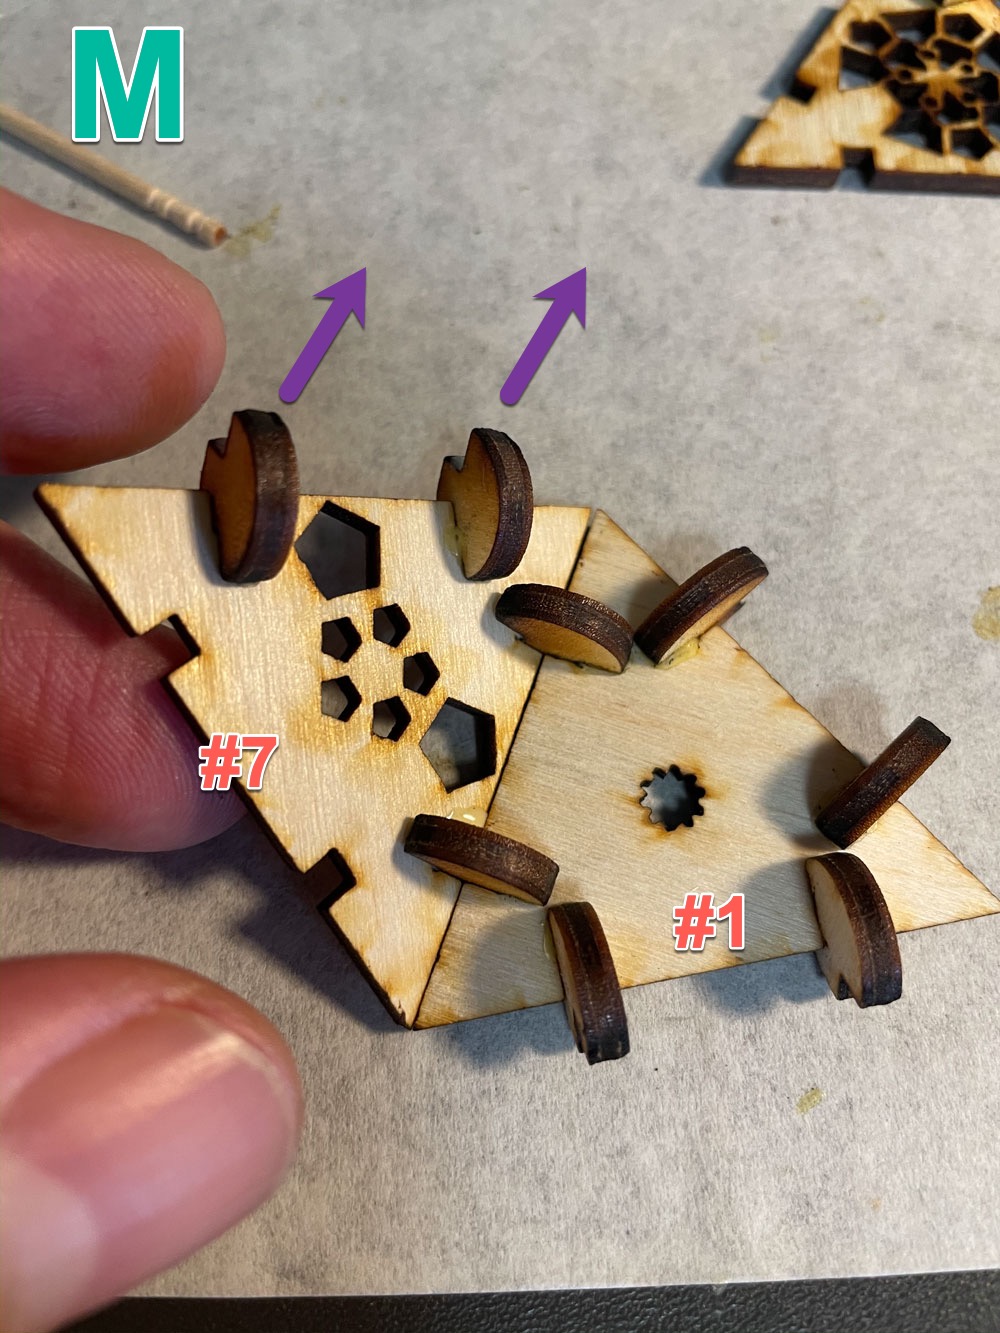
- Apply glue to the joint pieces on two edges of face piece #1. Starting with face piece #7, attach this to face piece #1 with its two joints pointing to the right (note purple arrows) as in image M below.

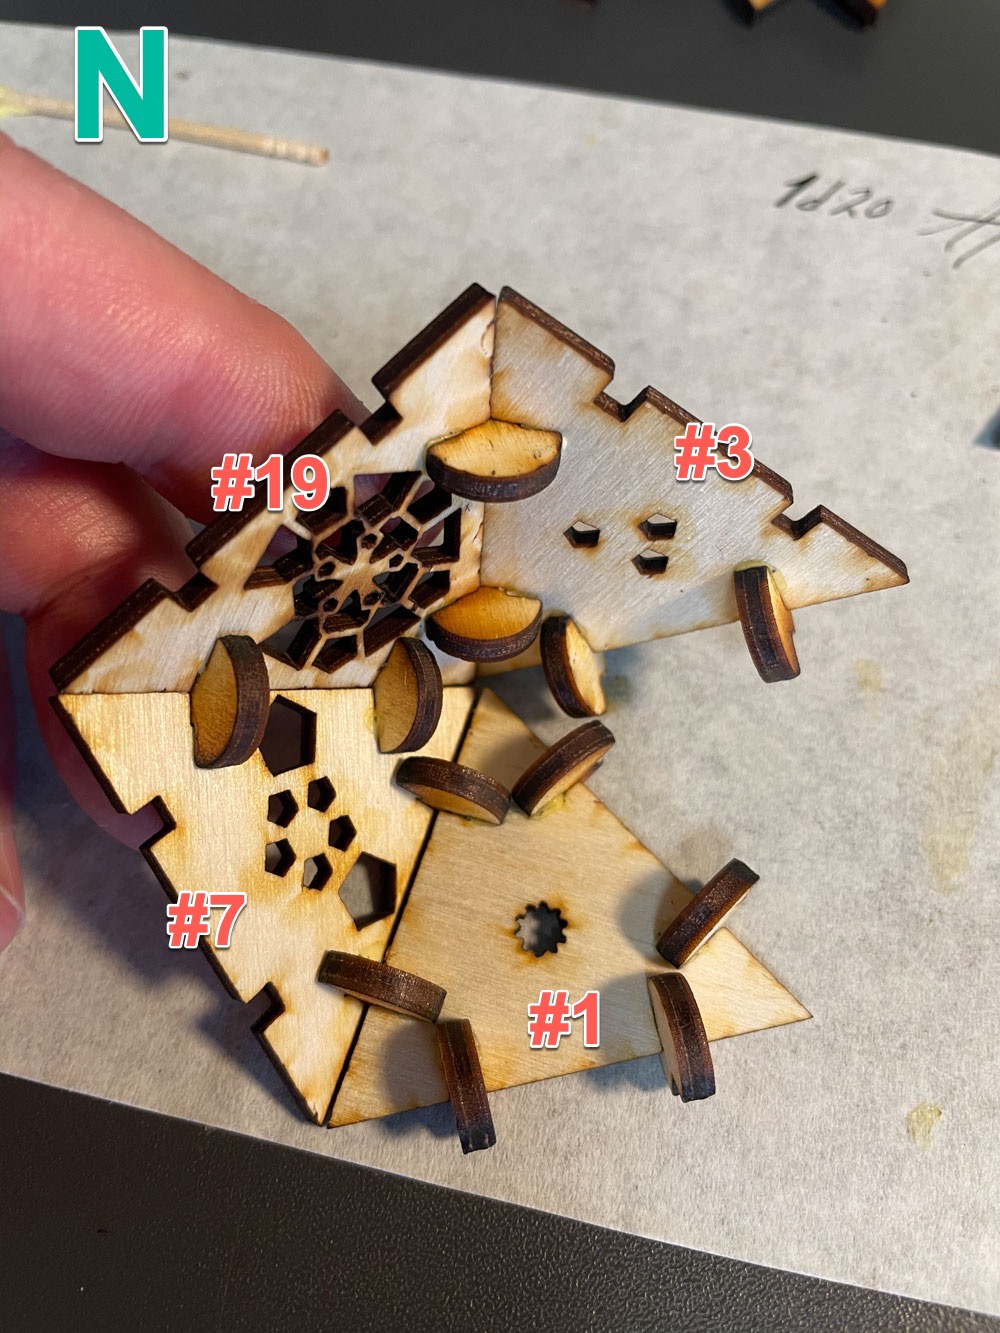
- Continue by glueing face piece #19 to the right of #7 and face piece #3 to the right of #19 as seen in image N below – always with their joints facing to the right.
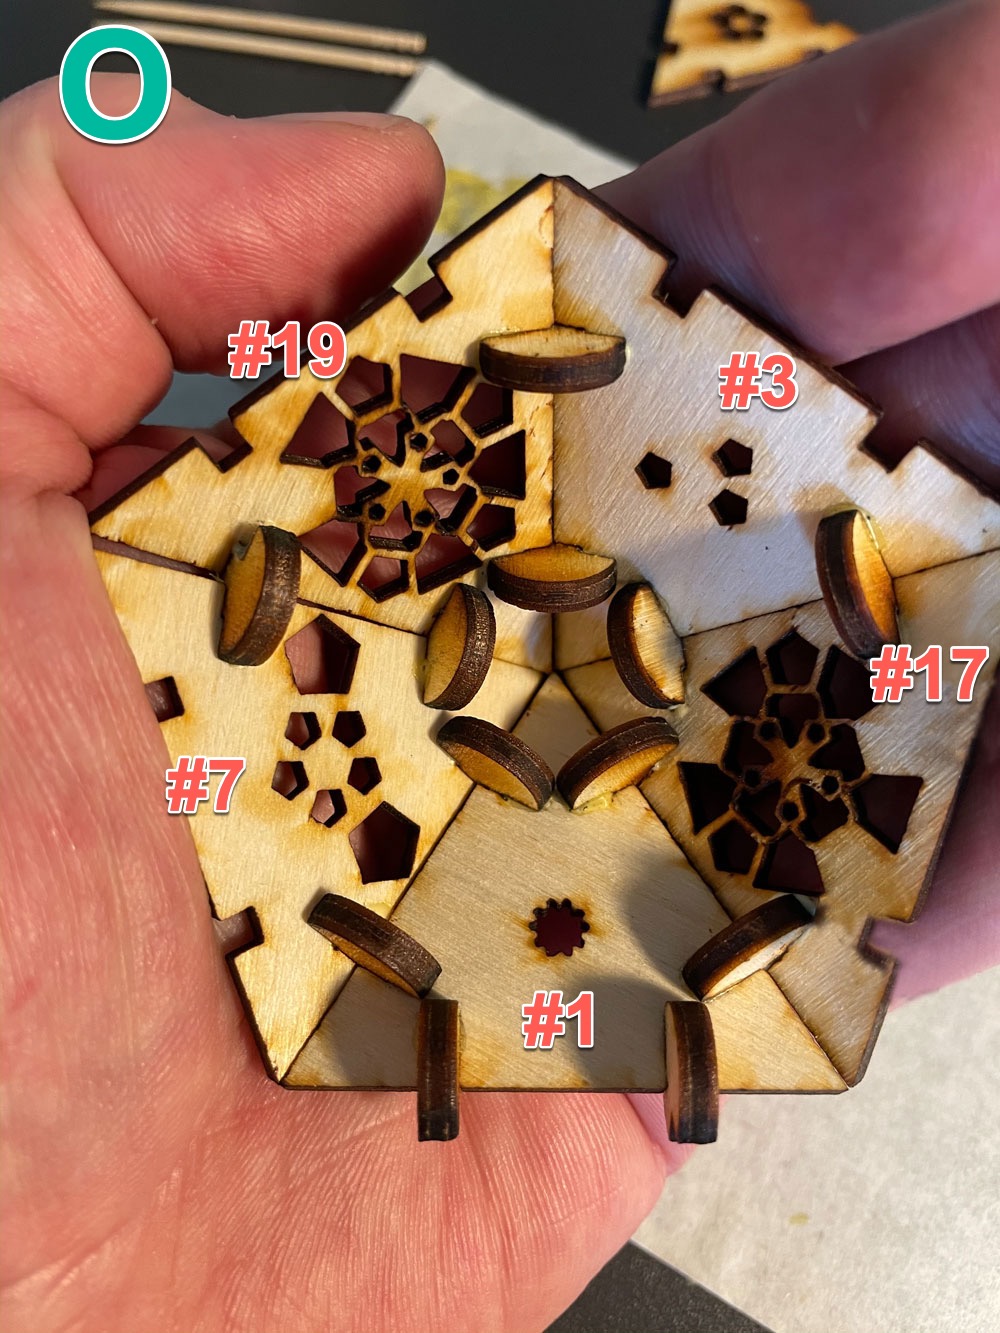
- Last, glue face piece #17 between #1 and #3 as seen in image O below. Cup the pieces in your hand and nudge the edges together and lightly press the joints to ensure everything is snug and aligned. Continue holding until the glue begins to harden. Set this partially constructed section aside.
Almost There!
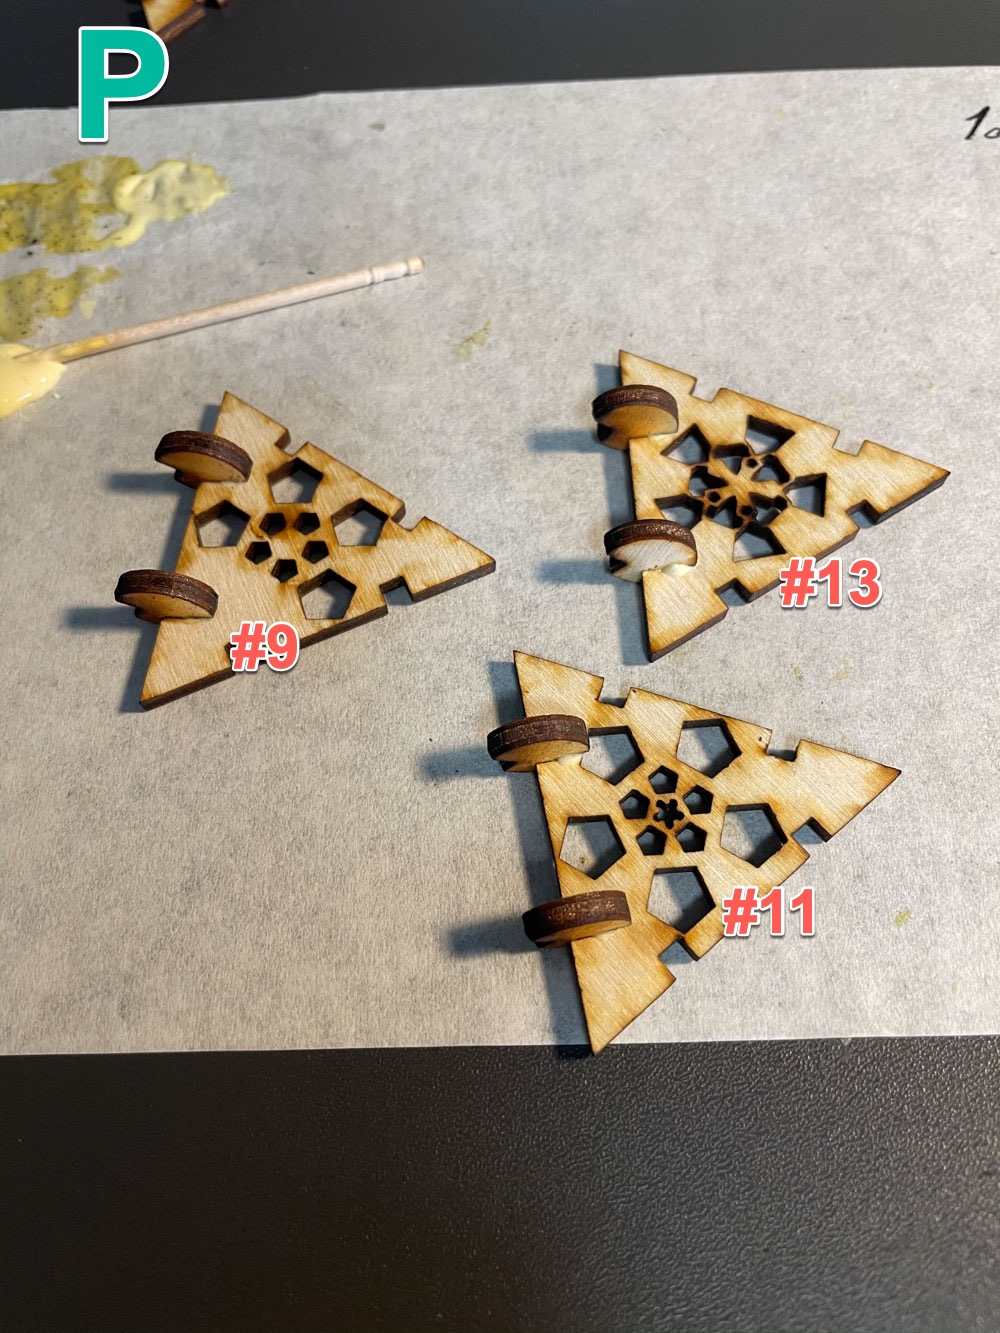
- Select face pieces #9, #11, and #13. Glue 2 joint pieces to each of these faces as seen in image P above. Set aside for 2 minutes to partially dry.
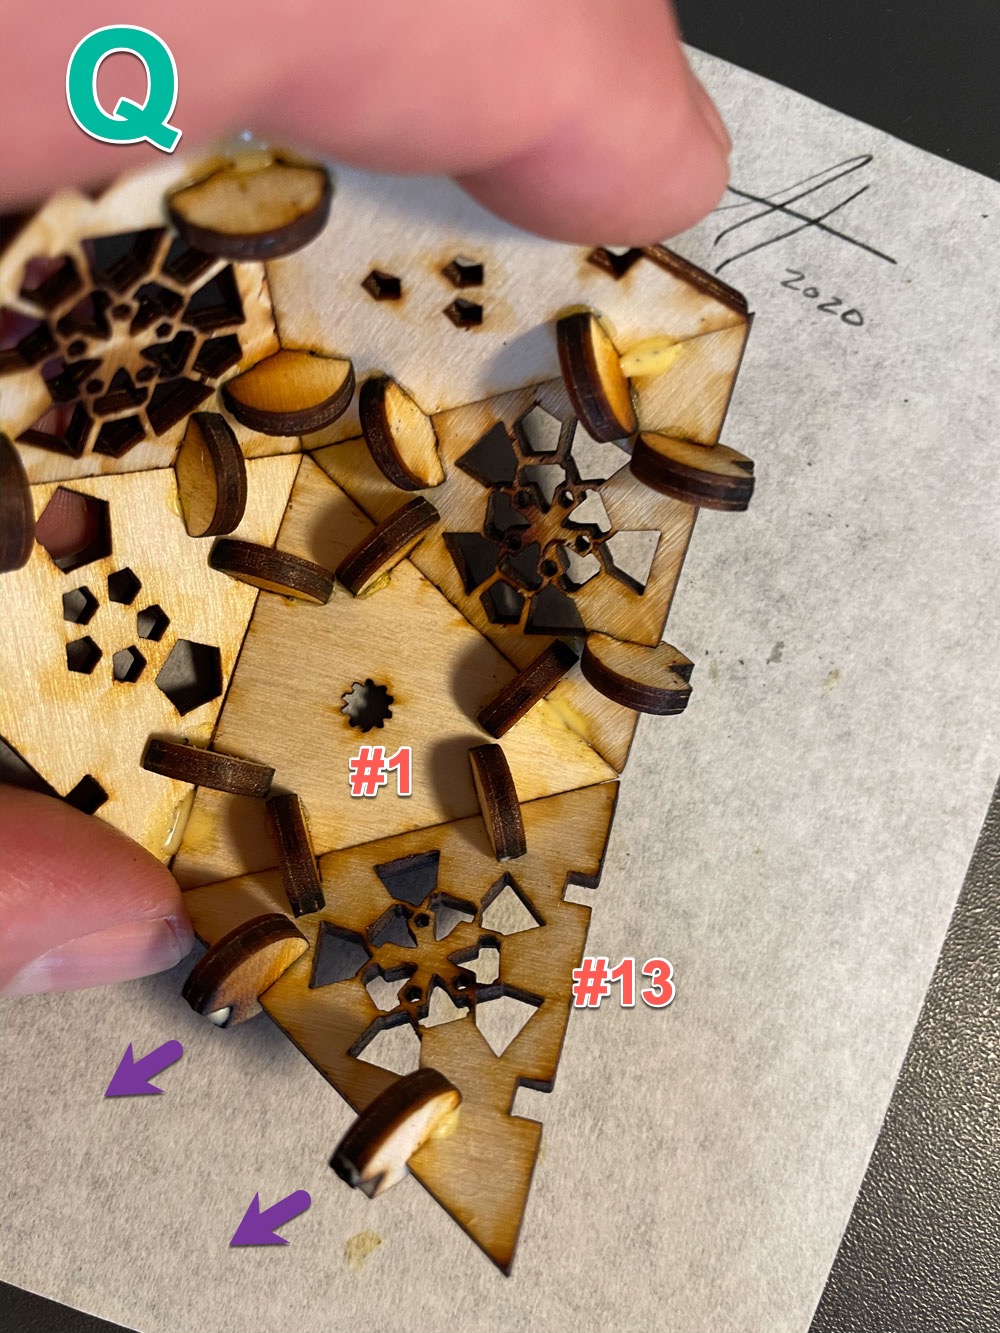
- Grab your partially constructed section and set it on your work surface with face #1 on the bottom. Apply glue to the joints on face #1 and attach face piece #13, with its 2 joints facing to the left (note purple arrows) as seen in image Q below.
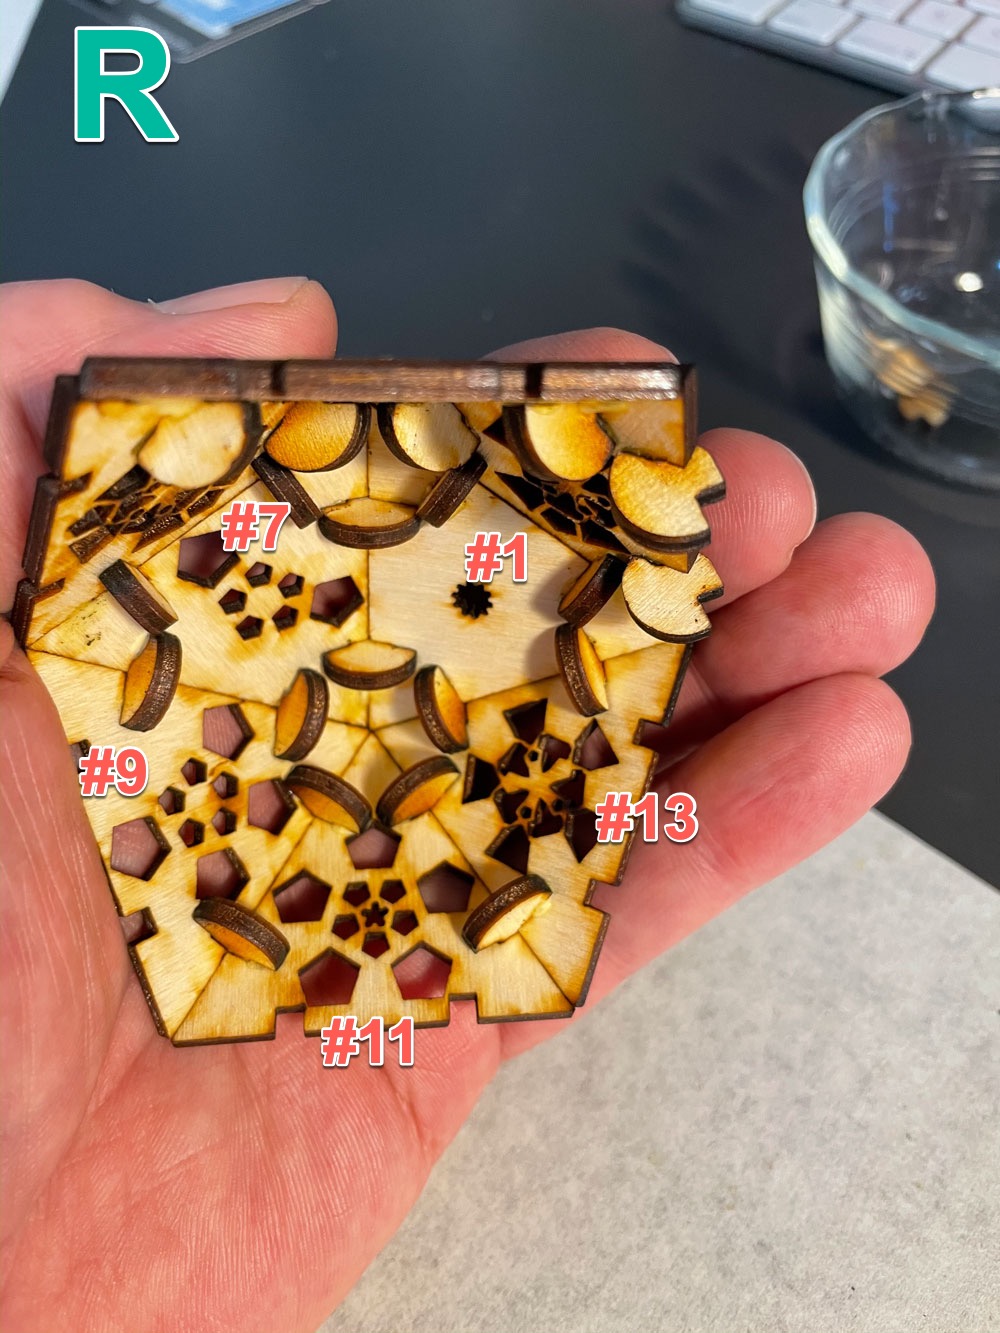
- Continuing with face #11, glue this to face piece #13, making sure its joints point off to the left. Then glue face piece #9 between face piece #11 and face piece #7 as seen in image R below. Cup the pieces in your hand and nudge the edges together and lightly press the joints to ensure everything is snug and aligned.
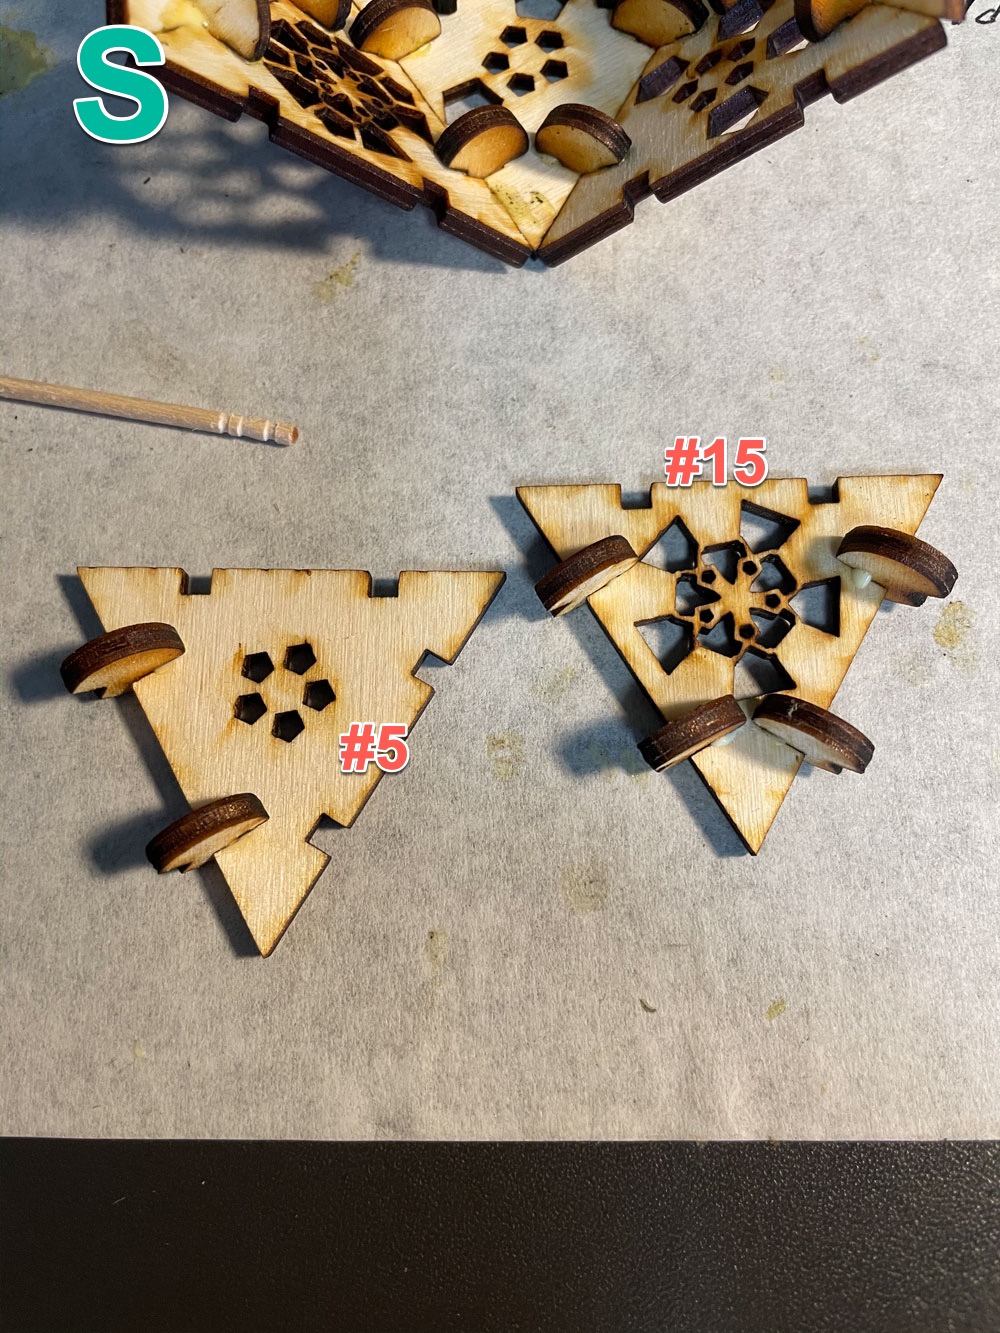
- Select face pieces #5 and #15. Glue 2 joint pieces to face piece #5 and 4 joint pieces to #15 as seen in image S above. Set aside for 2 minutes to partially dry.
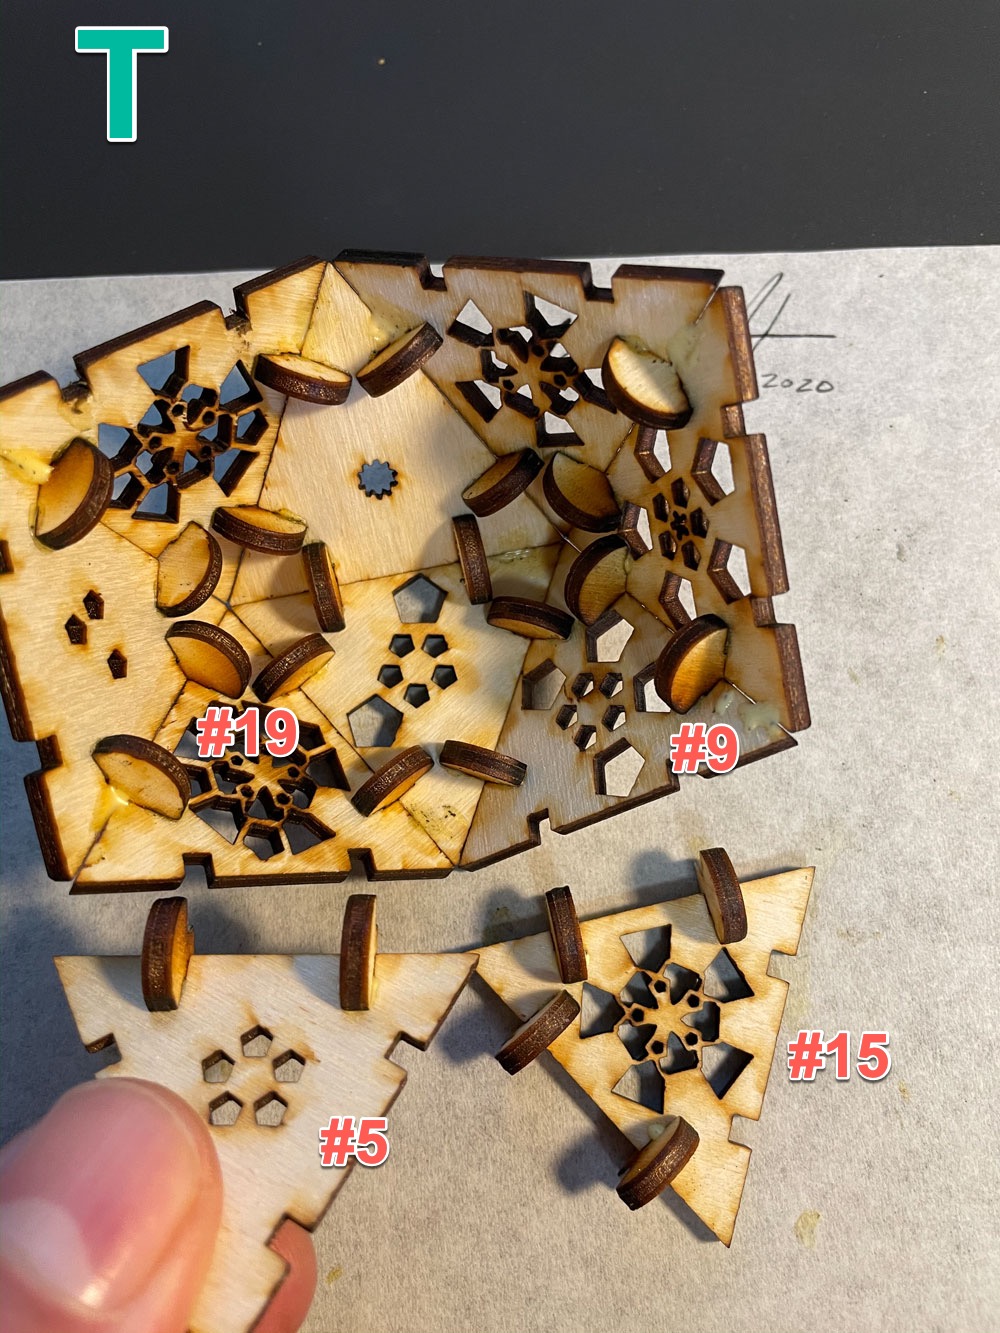
- Align face pieces #5 and #15 as seen in image T below. Starting with face piece #5, glue this piece to face #19. Then attach face piece #15 between face pieces #5 and #9.
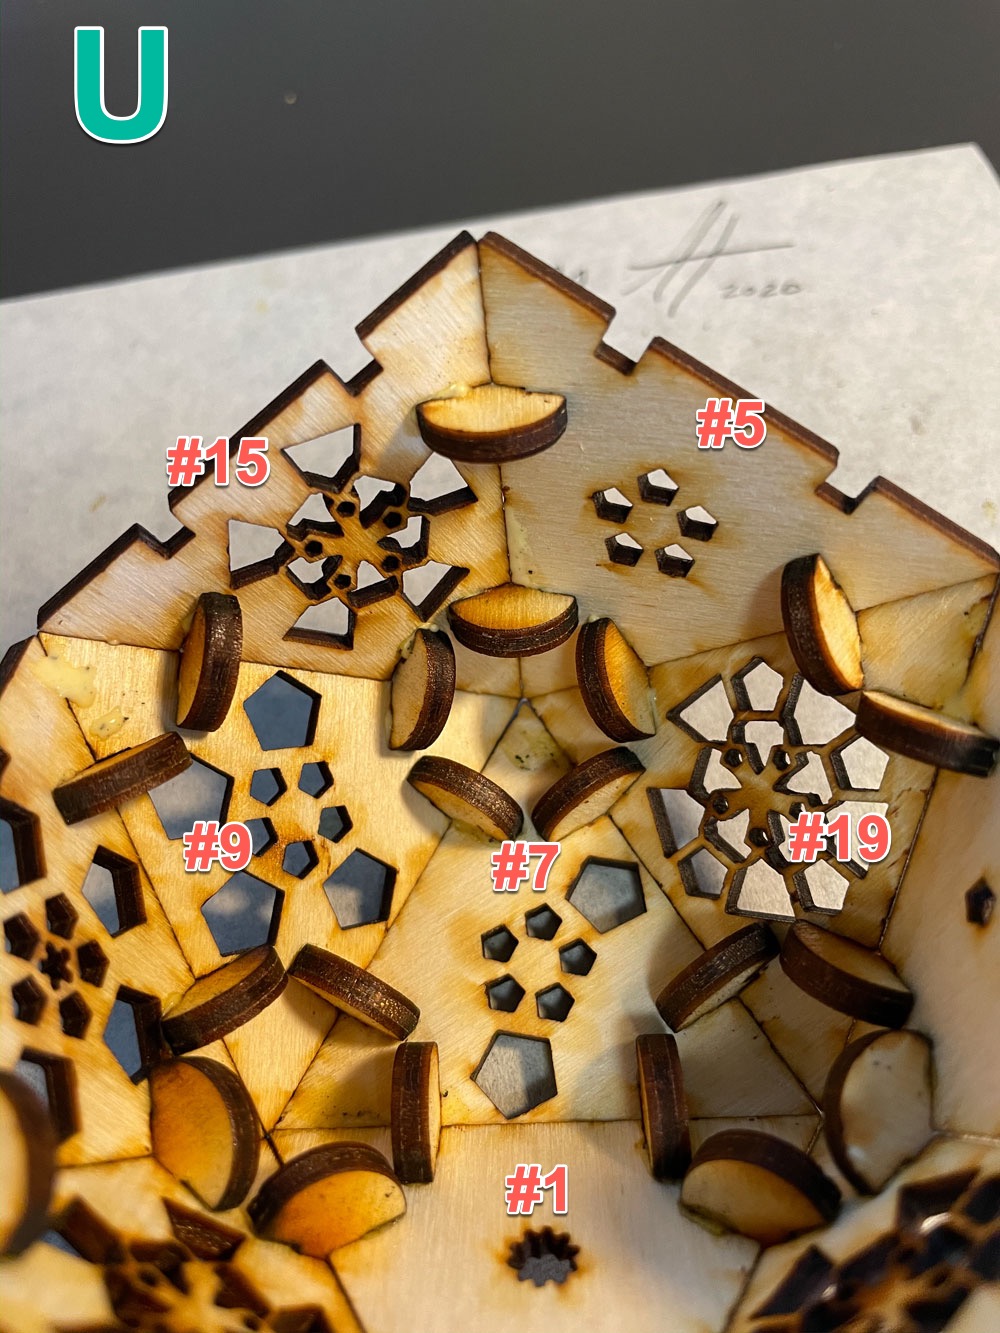
- When completed, this second half of your project should look like image U below. Cup the pieces in your hand and nudge the edges together and lightly press the joints to ensure everything is snug and aligned.
- If you want, for extra strength, you can dab glue with your toothpick to the inside edges between face pieces just like we suggested for the first completed half.
Joining the Two Halves:
Now comes the exciting part, joining the two halves together to form your finished polyhedron.Handy Tip:
During this final construction step, you may need to tweak and squeeze, pry and fiddle to make sure all joints connect together. We have found it useful to have a letter opener, small flat-blade screwdriver (like for eyeglasses), or some other dull pointed tool at hand to help if you need to gently pry pieces, joints, or otherwise assist everything in fitting well together.- Apply glue to all of the joint pieces on the half that has exposed joints.
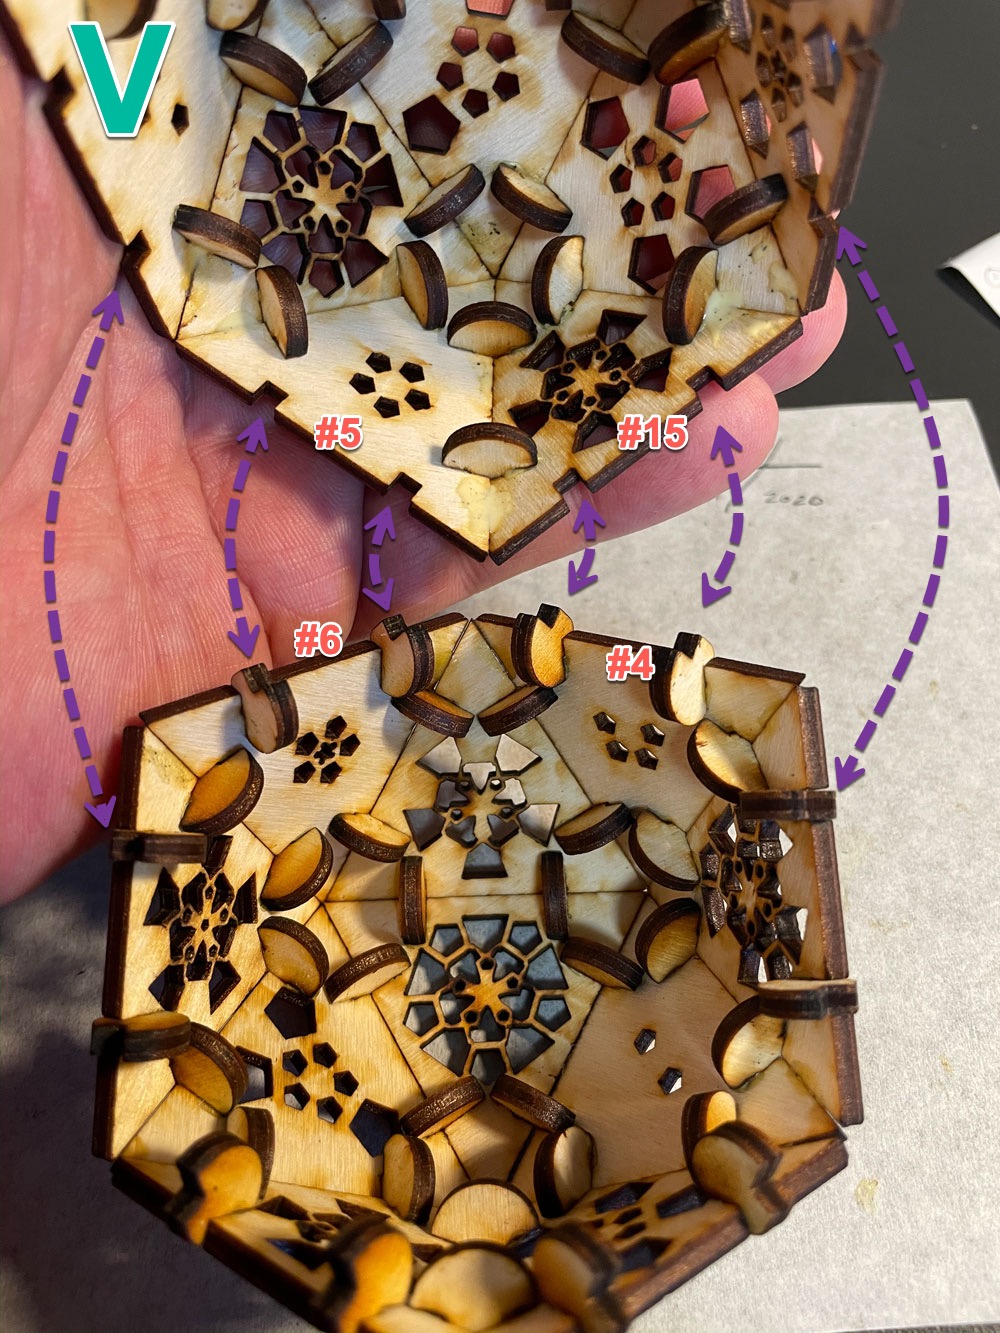
- Align the two halves so that faces #4 and #15 will mate, as well as faces #5 and #6 as seen in image V below.
- Place the two halves together and start nudging and squeezing the halves together. If a joint will not slip into another face's edge slot, use your little tool to pry and tweak the joint piece and your hand to apply slight presure to bend the faces to help everything come together. If a joint piece comes loose, just add more glue and re-attach before continuing to join the halves. Once everything has joined, you can use your two hands to firmly cup and press the entire project and snug up all of the edges and joints. Your final project should look like image W below.
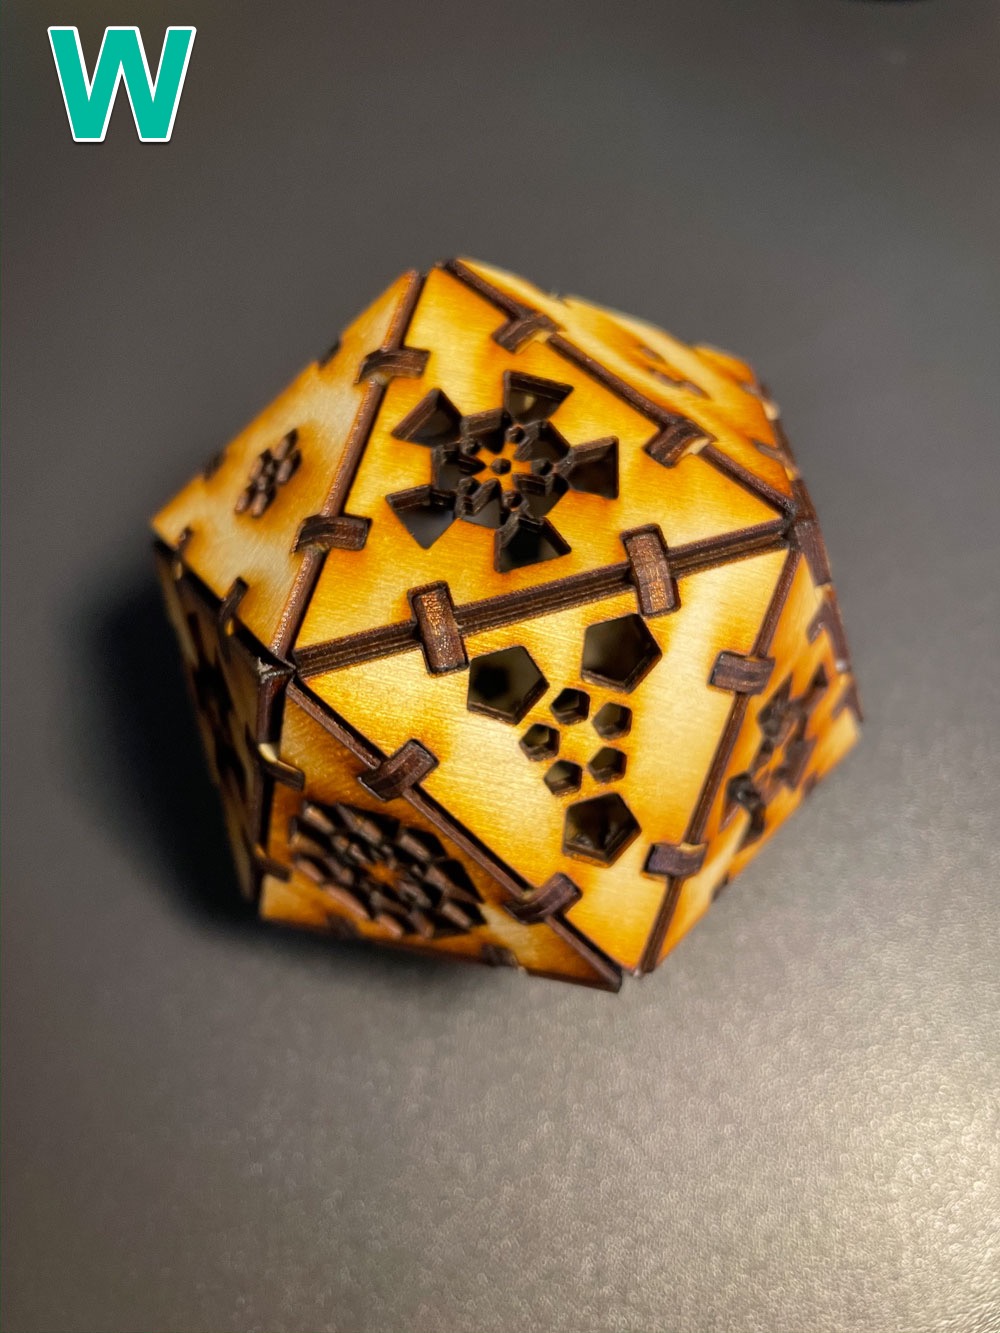
Congratulations! You have a beautiful peice of art!
Feel free to apply a light stain or coat with varnish or polyurethane for beauty and strength.